
Private Registry inside Ruk-Com Cloud PaaS
This guide is maintained for Ruk-Com PaaS. Screens and options may vary by platform version and account permissions.
Confirm the environment, region and account permissions, and back up current settings before changing a production system.
Objective
This guide explains how to use Private Registry inside Ruk-Com Cloud PaaS on Ruk-Com Cloud PaaS, with ordered procedures and practical verification points.
Before you begin
- Sign in with an account permitted to manage the relevant environment.
- Confirm the target environment, region and resources before saving changes.
- Create a backup or rollback plan before changing a production system.
Docker solutionIt is designed for convenience in application distribution. Using a fast and lightweight template which can run your project almost anywhere Therefore, it is the perfect technology for developers and system administrators who want to speed up workflow delivery and avoid constant change issues.
Manually managing a Docker image requires a proper registry, with most Dockerized solutions being stored in a public registry for everyone to use. However, sometimes it is necessary to hide the content of your data from others, for example in cases where it contains proprietary code or confidential information. For this purpose, you can create your own separate registry.
So let's see how to do it at Ruk-Com Cloud Paltform in just a few minutes by following the next steps:
After that you can deploy the image added fromprivate registryeasily to your Ruk-Com Cloud PaaS.
Deploy Private Registry
The basic template for the private registry can be found in the open-source images at Docker Hub, so you can easily host it internally. Ruk-Com Cloud installations can customize the appropriate container:
1. Log in with your Ruk-Com Cloud account and click the button.New Environmentat the top of the window
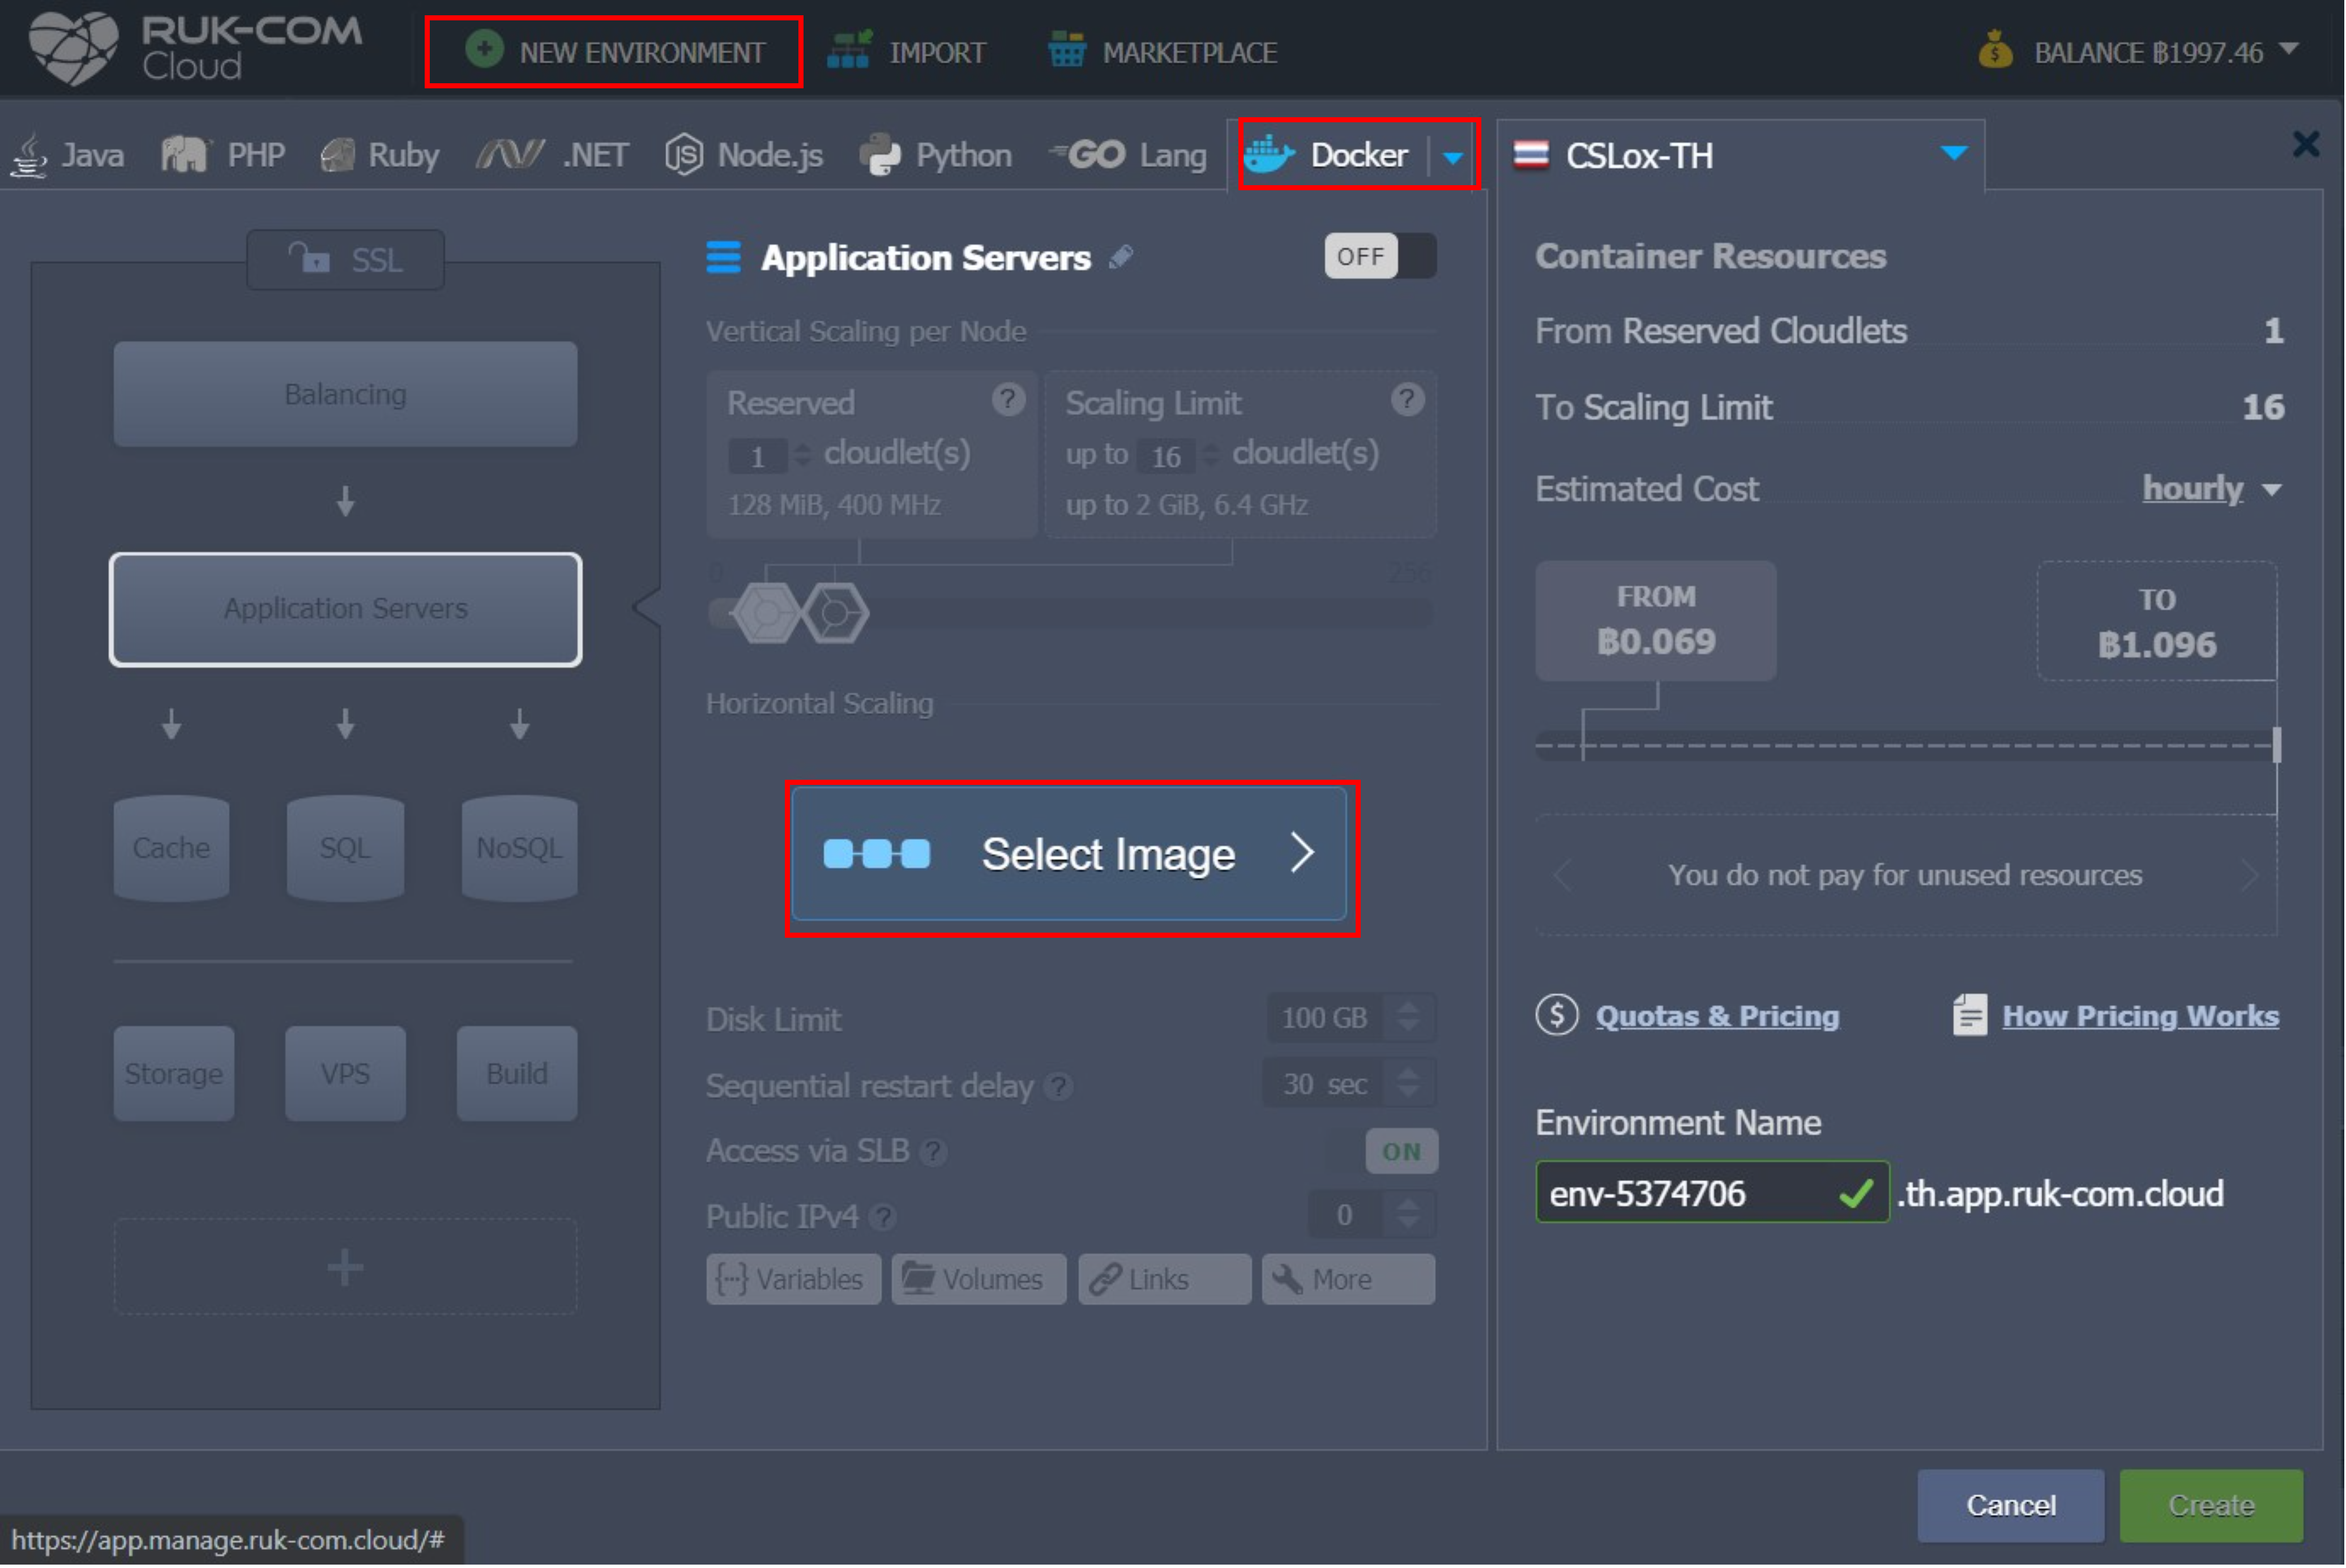
When the topology wizard is open, switch to the tab.DockerThen clickSelect Image
2. Use search to find the image registry and add it.
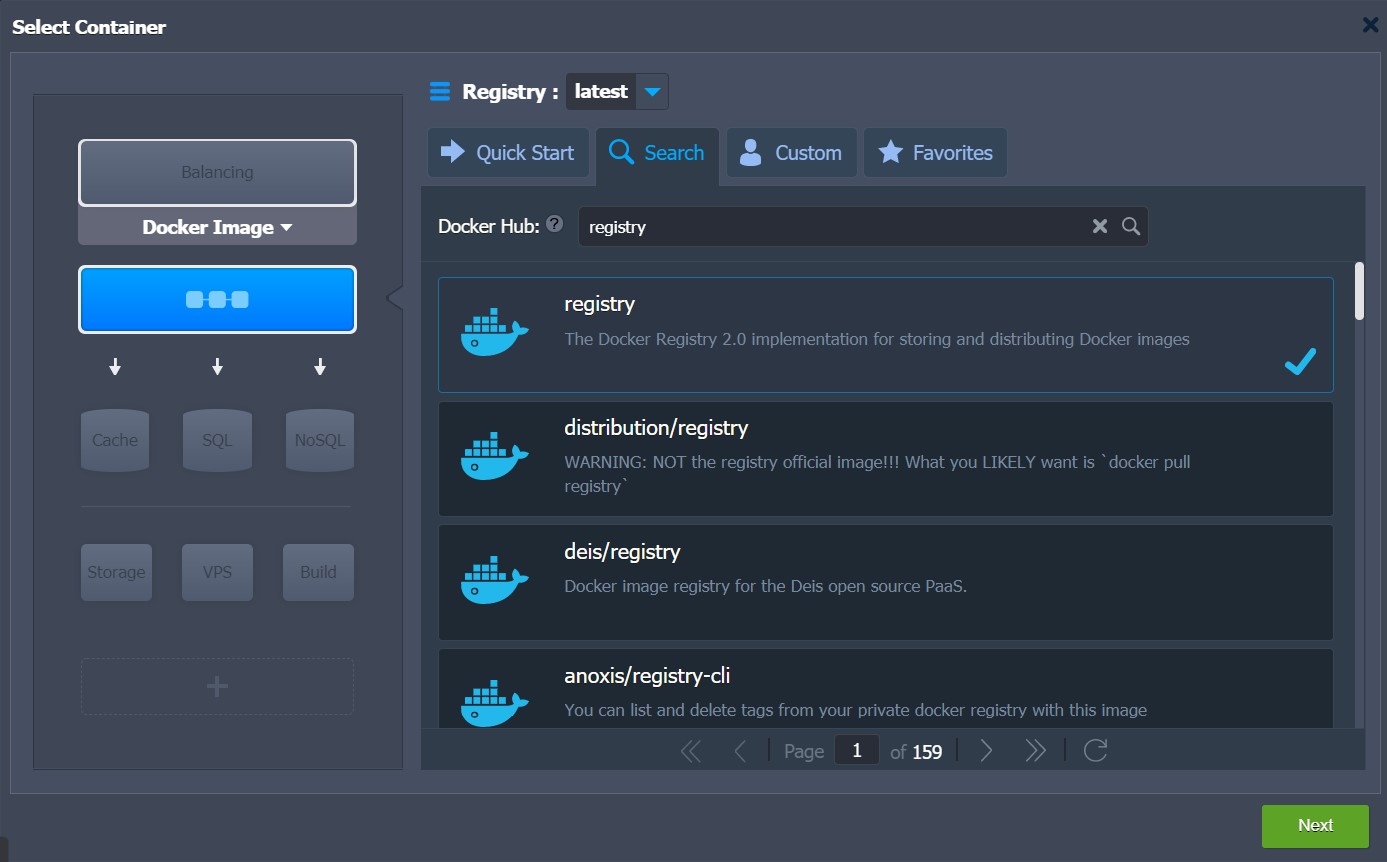
Tips:You can select the desired tag for the Docker image at the top of this frame or during the next step.
3. TheconfigurationsAll other things for the environment (disk restrictions, names,Region, and others) according to your needs.
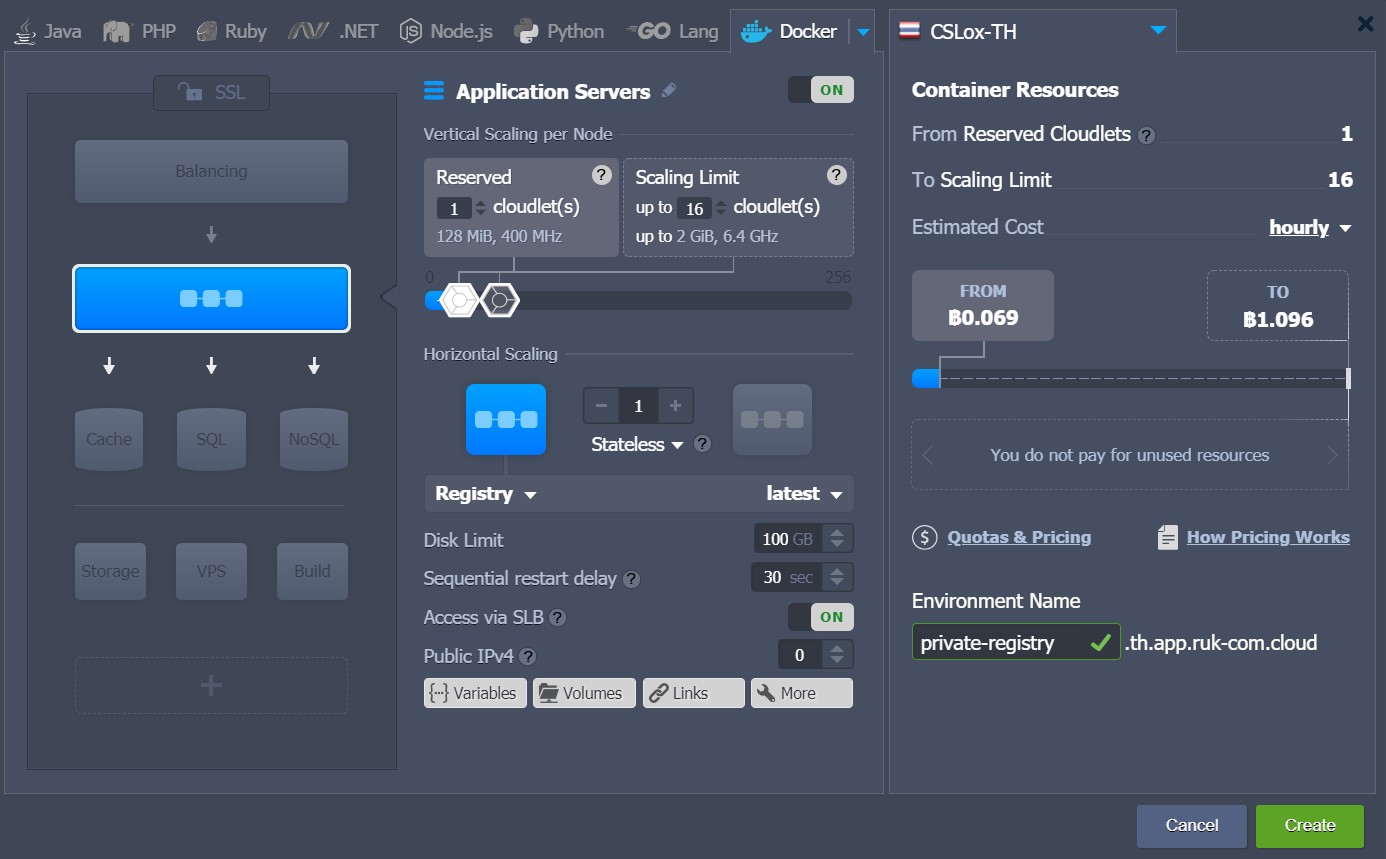
Note:
The instructions below are suitable forThe newest version of the registry(versions starting with tag 2.x and above) fordeprecated registriesConfiguration and compatibility details may vary.
4. Now you need to configure the entry point for external access. This will be created using Ruk-Com Cloud.endpointsfeature to reveal container ports5000
More:Alternately you can attach and work throughPublicIP (optional paid option) without any additional configuration required
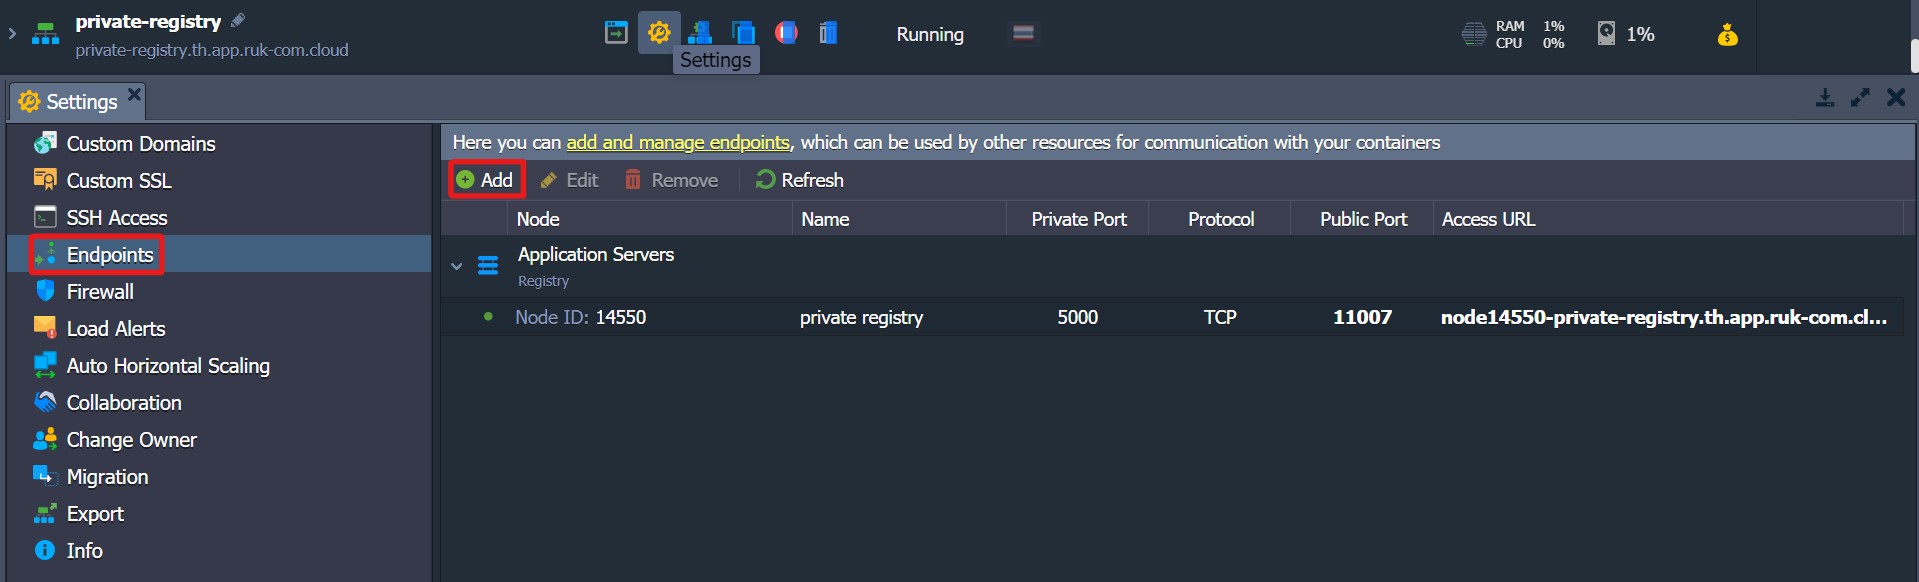
Click on the buttonSettingnext to your environment, then selectEndpointsand press Add to add a new enpoint within the open frame. You can enter the desired parameters by specifying the number.private port5000
So you will get a result similar to the one shown above and now you can start populating the registry with Docker images.
Add Image to Registry
Adding Docker templates to your registry is done by importing an external image from the central hub registry into our private repository.private repository(However, you can do this manually on your machine.) This will require some minor adjustments to your machine's configuration. In order to be able to use it correctly
1 Start with installationDocker CE(If you haven't done this before), click on the link to view the manual on the official website.
More:Make sure the installed daemon is version 1.6.0 or later (as the registry will be incompatible with earlier versions). You can check the Docker daemon version by running the following command in the terminal:
docker -v
2. Then select the image you want in Docker Hub using the pull command and tag the provided template to point to your own private registry (or in the case of using your local template, skip the first command)
docker pull {image} && docker tag {image} {entry_point}/{repository}where:
- {image}- The name of the Docker template you want to pull and tag (e.g. Ruk-Com/apachephp)
- {entry_point}- entry point of private registry such as destinationendpoint(generated at the end of the Access URL) or external IP address

- {repository}- The name of the remote private registry (e.g. apachephp) for the image to be stored.

3. Additional details - While private, the remote registry needs to be secured together with TLS and you must attach the relevant SSL certificate (such as server key and domain certificate) issued by your registry's CA.
Tips:can use certificateself-signed certificatethat can be signed by oneself as well In this case you will need to instruct the Docker daemon.trustmanually
However, for testing purposes you can use a somewhat simpler configuration that allows to bypass this requirement - run your registry inUnsafe modeTherefore, all communication is carried out over plain HTTP (althoughHighly not recommendedin the scope of use)
By adding this line in configuration file/etc/default/dockerto your daemon (or similar file according to your OS distribution) e.g. use vim to edit with sudo permissions:
DOCKER_OPTS="--insecure-registry {entry_point}"Don't forget to Save to save changes.

Note:In cases where self-signed certificates or other insecure options are used, additional configuration will be required for every Docker daemon that needs access to your registry.
4. You can now restart the Docker daemon on your machine and push the prepared image to your remote repository.
sudo service docker restart
docker push  {entry_point}/ {repository}
After that, your image will be uploaded to the registry (which time depends on the size of the image and your internet speed) and will be ready for use.
Because of this, you candeployeasily within Ruk-Com Cloud PaaS in the same way as the how-to instructions above.
In case you encounter any problems while deploying your registry or adding images, you can get help from our technical experts at Stackoverflow