
Let's Encrypt SSL
This guide is maintained for Ruk-Com PaaS. Screens and options may vary by platform version and account permissions.
Confirm the environment, region and account permissions, and back up current settings before changing a production system.
Nowadays, an SSL is a necessity for any website in production, and certificate issuing and renewal are now routine tasks. Tools like Let’s Encrypt use open-source Certbot with the standalone authenticator to easily automate these operations. The main drawback here is the possible downtime of the web application server during automatic certificate renewal and domain validation.
In order to overcome a problem with uptime during SSL certificate updates, the Ruk-Com PaaS created a built-in Let’s Encrypt Add-On with an advanced zero-downtime renewal algorithm.
Downtime Reasons while Updating SSL Certificate with Certbot
The certbot command-line tool’s main purpose is to configure an HTTPS server and automatically obtain a trusted certificate without human intervention. It performs the following tasks:
- proves that you are in control of the website
- receives a certificate and configures it on a web server
- tracks certificate expiration and updates it
- helps users revoke their certificate (if needed)
- forces certificate renewal when required
First, Certbot initiates the issuance of an SSL certificate by sending Certificate Signing Requests (CSR). Then, it starts a Certificate Management Agent (CMA), which is a Python web server that listens to the specified port to handle validation request from the Let’s Encrypt CA. Before obtaining a certificate, it is necessary to prove that renewal was invoked by the domain administrator. The validation requests always happens on port 80, which is usually occupied by the application listening to HTTP traffic. So, the web server on which it is running must be temporarily stopped to run CMA instead. Consequently, such implementation causes application downtime.
Another issue that can cause downtime is that the Python web server can become stuck once it tries to handle a non-validation HTTP request that can come from any user. It happens since Certbot runs the web server in a single-threaded mode. Consequently, it can’t handle multiple incoming requests.
Solution to Avoid Downtime during SSL Certificate Update
In order to omit the mentioned issues, Ruk-Com PaaS created a built-in Let’s Encrypt Add-On that includes an improved algorithm. It presupposes using routing rules to integrate an intermediate reverse proxy layer into the traffic chain to filter HTTP traffic. The proxy is configured to route the request to the Python web server from Let’s Encrypt CA only. Other traffic is routed to the user’s application.
Routing to Proxy Port
The add-on does not stop the application’s web server and redirects requests from website port 80 to the proxy port (e.g., 12347) via iptables/nftables rules until validation is completed.
shell Copy
if grep -a 'AlmaLinux' /etc/system-release ; then
    /usr/sbin/nft insert rule ip filter INPUT tcp dport ${PROXY_PORT} counter accept comment "LE"
    /usr/sbin/nft insert rule ip filter INPUT tcp dport ${LE_PORT} counter accept comment "LE"
    /usr/sbin/nft insert rule ip6 filter INPUT tcp dport ${LE_PORT} counter accept comment "LE"
    /usr/sbin/nft insert rule ip6 filter INPUT tcp dport ${PROXY_PORT} counter accept comment "LE"
    /usr/sbin/nft insert rule ip nat PREROUTING ip saddr != 127.0.0.1 tcp dport 80 counter redirect to ${PROXY_PORT} comment "LE"
    /usr/sbin/nft insert rule ip6 nat PREROUTING ip6 saddr != ::1 tcp dport 80 counter redirect to ${LE_PORT} comment "LE"  || \
        /usr/sbin/nft insert rule ip6 filter INPUT tcp dport 80 counter drop comment "LE"
 else
    iptables -I INPUT -p tcp -m tcp --dport ${PROXY_PORT} -j ACCEPT
    iptables -I INPUT -p tcp -m tcp --dport ${LE_PORT} -j ACCEPT
    ip6tables -I INPUT -p tcp -m tcp --dport ${LE_PORT} -j ACCEPT
    iptables -t nat -I PREROUTING -p tcp -m tcp ! -s 127.0.0.1/32 --dport 80 -j REDIRECT --to-ports ${PROXY_PORT}
    ip6tables -t nat -I PREROUTING -p tcp -m tcp --dport 80 -j REDIRECT --to-ports ${LE_PORT} || ip6tables -I INPUT -p tcp -m tcp --dport 80 -j DROP
 fi
Where:
- ${PROXY_PORT} - 12347
- ${LE_PORT} - 12348
Intermediate Reverse Proxy
conf Copy
User tinyproxy
Group tinyproxy

Port 12347
Timeout 6000

MaxClients 100
MinSpareServers 5
MaxSpareServers 20
StartServers 10
MaxRequestsPerChild 0

BindSame yes
DisableViaHeader Yes

ConnectPort 80
ConnectPort 12348

AddHeader "X-Forwarded-Proto" "http"
ReversePath "/" "http://127.0.0.1/"
ReversePath "/.well-known/acme-challenge/" "http://127.0.0.1:12348/.well-known/acme-challenge/"
ReverseOnly Yes
ReverseMagic Yes
Here, the ReversePath directives enable reverse proxy support and define the HTTP traffic filtering rules. Any request that will come with the substring “/.well-known/acme-challenge/” will be routed to the Python web server that listens to port 12348 to get a validation file from the hidden .well-known/acme-challenge/ directory. Only Let’s Encrypt CA generates such requests. The rest of the HTTP traffic will be routed to the web application that listens on port 80. This is how the Let’s Encrypt add-on proves that CSR was initiated by the domain administrator.
Use Case: Zero Downtime SSL Update in WordPress Websites
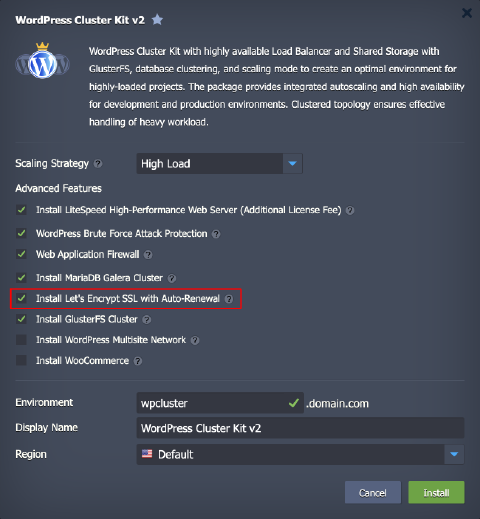
Now, let’s see how it works in a real-case scenario using a WordPress application as a sample. While WordPress package (Cluster or Standalone) installation, enable the “Install Let’s Encrypt SSL with Auto-Renewal” option.
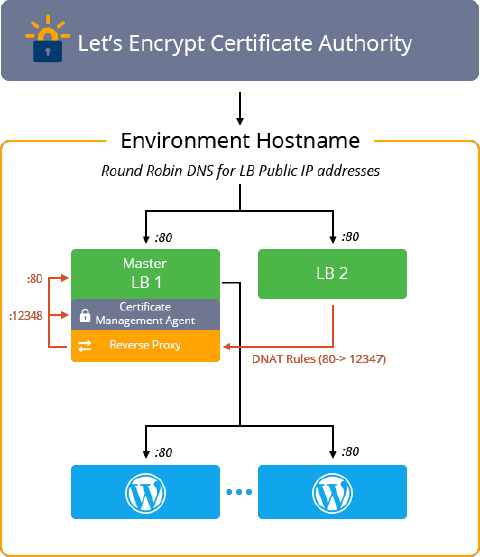
 * WordPress Cluster
In the case of a WordPress clustered environment, traffic is redirected from all load balancers to the master node (the first or initially created container in the layer), where the validation server is located.
 * WordPress Standalone
Traffic flow in a WordPress standalone container (with certified LLSMP or LEMP templates) is shown in the illustration below.
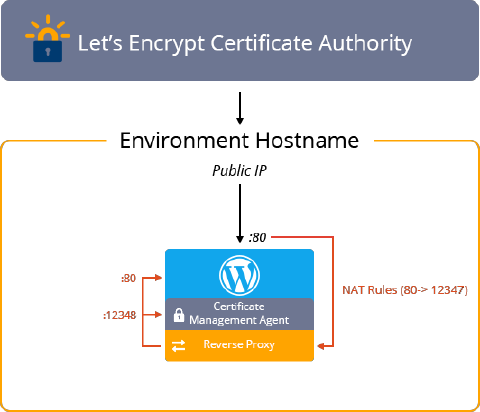 According to the filtering rules, the proxy outputs traffic either to the Python web server port 12348 or to port 80 of the user’s web server.
Renewing Let’s Encrypt Certificate Using Webroot Authenticator
There is an additional method to issue new certificates or update existing ones, which is called webroot. This method is preferable for highly loaded websites (thus soon will be added to the WordPress cluster by default) as it does not interrupt web servers’ work and omits the risk of downtime or performance degradation.
The webroot can be used with certified PHP software stacks, as in the WordPress packages. When launched, it obtains a path to the site’s root directory. Then Certbot creates a directory structure there for storing temporary files:
text Copy
${webroot-path}/.well-known/acme-challenge
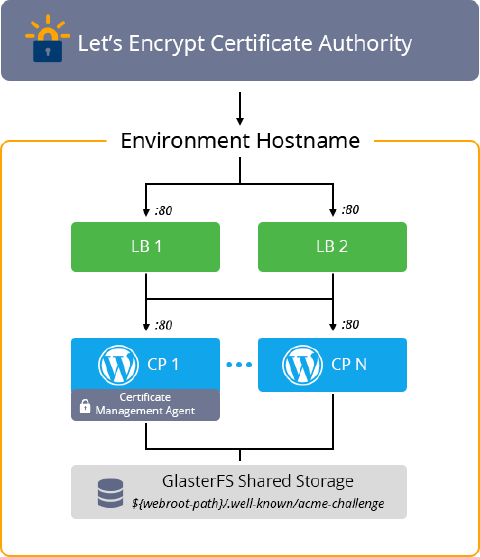 Let’s Encrypt server checks for the presence of this file in the specified location with a request of this type:
text Copy
http://example.com/.well-known/acme-challenge/KJr5D^ReTW4kY_Z6UIIkjlmlmOkyQgPr_7ArlLgtZE7Fg
If the requested temporary file (for example, “KJr5D^ReTW4kY_Z6UIIkjlmlmOkyQgPr_7ArlLgtZE7Fg”) exists, then domain ownership will be successfully verified, and the certificate will be issued and uploaded to the users’ website.
After completing the validation procedure, the Certbot obtains the certificate file. Usually, the Let’s Encrypt SSL certificate file is stored in the /etc/letsencrypt/live directory, where all the files are symlinks to the files in the /etc/letsencrypt/archive directory.
As you can see, there are options to achieve full uptime during SSL certificate updates. To make it even easier and automated, Ruk-Com PaaS implemented the required algorithm in the Let’s Encrypt add-on, as well as made this solution built-in to the WordPress cluster and standalone packages.