
Maven Plugin
This guide is maintained for Ruk-Com PaaS. Screens and options may vary by platform version and account permissions.
Confirm the environment, region and account permissions, and back up current settings before changing a production system.
Objective
This guide explains how to use Maven Plugin on Ruk-Com Cloud PaaS, with ordered procedures and practical verification points.
Before you begin
- Sign in with an account permitted to manage the relevant environment.
- Confirm the target environment, region and resources before saving changes.
- Create a backup or rollback plan before changing a production system.
Tips:Alternatively you can manage projects remotely (i.e. from anywhere on the internet) by creating a Maven build node at the Ruk-Com Cloud PaaS and storing the project to the desired GIT version control system.
Follow these next steps to deploy your Java application with the Maven plugin:
1. Begin by making sure your Java Environment is running to deploy your project. If you wantcreateNew can follow this guide.
2. Prepare a Java project using the build tool.Maven(You can do this manually or use an IDE.)
3. Adjust the configuration filepom.xmlTo do so, expand/expand the section and enter the correct values as below:
<plugin>
 <groupId>com.jelastic</groupId>
 <artifactId>jelastic-maven-plugin</artifactId>
 <version>1.9.3</version>
 <configuration>
    <apiToken>${token}</apiToken> <!--an access token is used instead of a login/password, see note below-->
    <artifact>{artifact}</artifact> <!--artifact to be deployed-->
    <context>{context}</context> <!--preferable context name (ROOT if skipped)-->
    <environment>{envName}</environment> <!--name of a target Jelastic environment-->
    <comment>{comment}</comment> <!--custom comment, if needed-->
   <api_hoster>{hosterDomain}</api_hoster> <!--domain name of your platform-->
 </configuration>
</plugin>
<pluginRepository>
     <id>sonatype-oss-public</id>
     <url>https://oss.sonatype.org/content/groups/public</url>
     <releases>
         <enabled>true</enabled>
     </releases>
     <snapshots>
         <enabled>true</enabled>
     </snapshots>
</pluginRepository>More:You can createaccess tokenfor pluginsMavenvia dashboard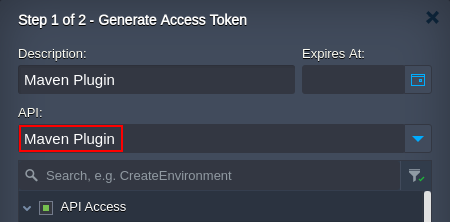
Don't forgetSaveto save changes
4. Open a command line on your local machine and go to your Maven project folder. You can use this command:
mvn jelastic:deploy -Djelastic.password={password}Start your application by replacing it. {password}with your Ruk-Com Cloud account password (token)
mvn jelastic:publishCreate and upload a.war file toDeployment managementof your account without actually deploying the project.
mvn clean install jelastic:deployRedeploys your project after code changes.
5. After the deployment is successful, you can go to the dashboard to make sure the files have been added to the environment.
To access the application you deployed, you can click a button.Open in BrowserThe Hello World application will be seen in our case.
You can see that this project was successfully built and deployed via Maven.