
Building Custom Container
This guide is maintained for Ruk-Com PaaS. Screens and options may vary by platform version and account permissions.
Confirm the environment, region and account permissions, and back up current settings before changing a production system.
With the Ruk-Com PaaS, the process of preparing your own Docker image can be greatly simplified by building it on the basis of the already existing one (namely - on the top of the platform AlmaLinux 9 base template). This allows you to skip all the steps, that are already accomplished within that “parent” template, and add the required adjustments only. We’ll showcase this procedure on the example of preparing a custom WildFly image - a flexible and lightweight Java application server, which is a direct successor of the popular JBoss solution.
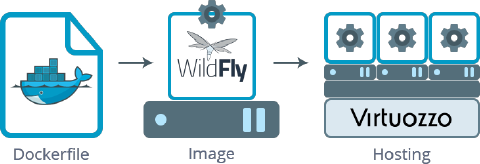 The most common way of building Docker images is composing a Dockerfile - a special manifest, which allows achieving the additional automation through listing the desired commands into a simple text file, which will be read and executed by the Docker daemon. In such a way, a new template will be created automatically based on the comprised instructions (while otherwise, you need to call every necessary operation manually, one by one).
Below, we’ll consider all the specifics of a custom image running on our platform, and, as a result, you’ll get the ready-to-work dockerized version of the WildFly server right inside the platform.
So, let’s walk through the required operations step-by-step:
Compose Dockerfile
To start with, create an empty text file - we’ll declare all the appropriate operations directly in it - and proceed with the following instructions.
Note: This section is exploratory in its nature and includes just the required basis for your dockerfile preparation. However, if you’d like to dive into the specifics of the process and get more detailed guidance, you can examine the official dockerfile references.
Also, you can download the already prepared dockerfile (with our WildFly image example) in advance and just look through this section for the performed actions explanations, skipping the manual file creation.
- The initial step is specifying the base template for our image building - we’ll use the Ruk-Com PaaSdocker/almalinuxbase one with the already configured AlmaLinux 9 operating system inside. In order to set this within dockerfile, the FROM instruction should be used:
dockerfile
FROM jelasticdocker/almalinuxbase:latest
- Next, you can specify the general image information (like metadata or some internal variables), which will be required during further configurations. Use the example below to set the needed values:
dockerfile
LABEL maintainer="Virtuozzo International GmbH."

ENV WILDFLY_VERSION=36.0.0.Final
ENV ADMIN_USER=admin
ENV ADMIN_PASSWORD=admin
where:
- LABEL- allows you to set image metadata via the appropriate key-value pairs (e.g., the author of the Docker image, its version, etc.)
- ENV- sets the main environment variables, i.e.:
- WILDFLY_VERSION - version of WildFly to build; can be changed to another release if necessary (get the list of the currently available versions)
- ADMIN_USER - the arbitrary administrator name for the subsequent accessing WildFly admin panel
- ADMIN_PASSWORD- the desired password for the specified user
- Now, you can declare the required configurations using the shell commands - the RUN operator should be used for this purpose.
First of all, you need to install the Java Development Kit (OpenJDK of the 17th version in our case) and the tar archiver (which will be used for decompressing the downloaded files):
dockerfile
RUN dnf -y install java-17-openjdk-devel tar && dnf -y update
This command ends with calling the installed packages’ general update.
- Next, let’s declare a few additional operations for downloading the WildFly source code from the official website and extracting it to the /opt folder.
dockerfile
RUN cd /opt && curl -LO https://github.com/wildfly/wildfly/releases/download/$WILDFLY_VERSION/wildfly-$WILDFLY_VERSION.tar.gz \
    && tar xf wildfly-${WILDFLY_VERSION}.tar.gz \
    && rm wildfly-${WILDFLY_VERSION}.tar.gz
- At this step, you need to create a symlink in order to shorten the path to the WildFly main directory and, as a result, to make it easily accessible:
dockerfile
RUN ln -s /opt/wildfly-$WILDFLY_VERSION /opt/wildfly
- Let’s proceed with the creation of the main configuration file for our WildFly server and put all the needed options into it:
dockerfile
RUN echo -en "WILDFLY_SH=/opt/wildfly/bin/standalone.sh\n\
WILDFLY_SERVER_CONFIG=standalone.xml\n\
WILDFLY_CONSOLE_LOG=/var/log/wildfly/console.log\n\
WILDFLY_OPTS=\"-b 0.0.0.0 -bmanagement=0.0.0.0 -Djboss.management.http.port=4949 -Djboss.management.https.port=4848 -Djboss.server.log.dir=/var/log/wildfly/\"\n" >> /etc/sysconfig/wildfly-standalone.conf
- Both AlmaLinux 9 and WildFly 36 are using the Systemd initiation script by default, so you can just copy the WildFly standalone service file to the systemd directory.
dockerfile
RUN cp /opt/wildfly-$WILDFLY_VERSION/bin/systemd/wildfly-standalone.service /etc/systemd/system/wildfly.service
- Next, we’ll enable WildFly to be run as a service and create the necessary directories for logging. Also, we need to create a dedicated user for running the WildFly server and set the permissions for the created directories.
dockerfile
RUN systemctl enable wildfly && mkdir -p /var/log/wildfly && adduser wildfly && \
    chown -R wildfly:wildfly /opt/wildfly-$WILDFLY_VERSION /opt/wildfly /var/log/wildfly
- To ensure secure access to the WildFly admin panel, we’ll generate a self-signed key. This can be done with the keytool utility, which is included in the JDK package.
dockerfile
RUN cd /opt/wildfly/standalone/configuration && \
    keypass=password; keytool -genkeypair -alias serverkey -keyalg RSA -keysize 4096 -validity 7360 \
    -keystore application.keystore -keypass $keypass -storepass $keypass -dname "cn=Server Administrator,o=Acme,c=GB" && \
    chown wildfly:wildfly application.keystore && \
    xmlstarlet ed -L -N s="urn:jboss:domain:community:20.0" -i "s:server/s:management/s:management-interfaces/s:http-interface/s:socket-binding" -t attr -n https -v "management-https" standalone.xml && \
    xmlstarlet ed -L -N s="urn:jboss:domain:community:20.0" -i "s:server/s:management/s:management-interfaces/s:http-interface" -t attr -n ssl-context -v "applicationSSC" standalone.xml
- Also, let’s add the user credentials we’ve defined within the second step for accessing the server’s admin panel:
dockerfile
RUN /opt/wildfly/bin/add-user.sh --user $ADMIN_USER --password $ADMIN_PASSWORD --silent --enable
- Now, we can correctly set a link to the admin panel on the default index.html page by defining the corresponding redirect (as our image will be deployed to a container without the external IP attached, port 4848 should be used here):
dockerfile
RUN sed -i "s/<a href=\"\/console\">/<a href=\"\/console\" onclick=\"javascript:event.target.port=4848;event.target.protocol=\'http:\';\">/" /opt/wildfly/welcome-content/index.html
- Add the English locale settings to the container.
dockerfile
RUN localedef -i en_US -f UTF-8 en_US.UTF-8
- Another required action is to set our Docker image to listen to the required ports at the runtime. The EXPOSE instruction is intended for this:
dockerfile
EXPOSE 22 80 443 8080 8743 9990 9993 8009 4848 4949
- Lastly, you need to set the ENTRYPOINT for defining a container to be run as executable. In our case, the bash shell should be specified:
dockerfile
ENTRYPOINT ["/bin/bash"]
That’s all! Just don’t forget to save all the declared settings to get the ready-to-go dockerfile.
Add Image to Repository
Once the proper dockerfile is prepared, you are ready to build your WildFly image and, subsequently, push it to the repository.
Note: Before starting, ensure you have the appropriate Docker CE version (according to the used OS type) installed for executing the below-described commands at the currently used machine.
So, follow the next steps to accomplish that:
- Run the docker build command with the required parameters to create a new image locally:
shell
sudo docker build -t {image_name} {dockerfile_location}
where
- {image_name} - image repository appellation; optionally, a version tag could be added after the “:” separator (e.g., examplerepo/wildfly:latest)
- {dockerfile_location} - either a local path or URL to your dockerfile (could be set as “.” if the file is located in the current directory)
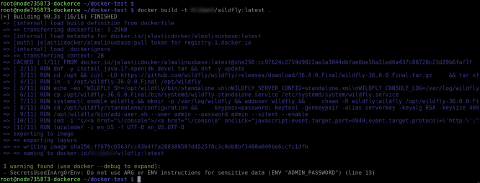 2. You should receive the build success message with the ID of your new image. To ensure it is available at your workstation, you can request the list of all local templates to be output with:
shell
sudo docker images
 3. Finally, you need to push (upload) your image to a registry with the corresponding command:
shell
sudo docker push {image_name}
Here, {image_name} should be stated the same as the one you specified during the image building in the first step.
You’ll be additionally requested to confirm your account ownership (by specifying the corresponding username, password, and email address) in order to complete this operation.
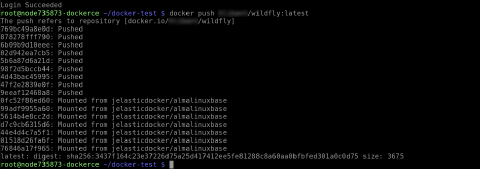
Tip: You can log into the registry in advance using the corresponding docker login command (as a result, your credentials will be stored in the ~/.docker/config.json file in your local user’s home directory).
Deploy Image
As soon as your image is successfully stored at the repository, it becomes available for usage at the platform and can be added to an environment through the dedicated Docker board integrated into the topology wizard dashboard sections.
So, select the New Environment button at the top of the dashboard, move to the Custom tab within the opened environment wizard, and click on the Select Image button.
- Here, you can use either the Search tab (for adding an image from the Docker Hub repository) or switch to the Custom section, where you can operate images of any type (including the private ones) and store your templates for being easily accessible.
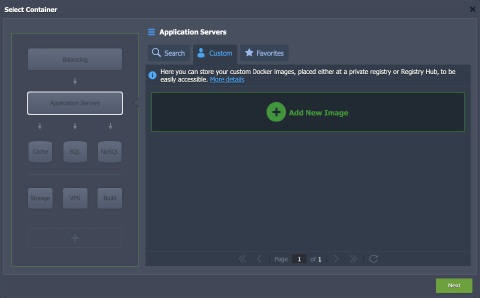 We’ll consider the latter option, so, once inside, choose the necessary environment layer to the left (Application Servers in our case) and click the Add New Image button.
- At the opened Add New Image frame, type your image identifier within the Name field in the following format
[{registry_hostname}/]{account_namespace}/{image_name}(registry can be skipped if the official Docker Hub is used).
Also, in case of private repository usage, the appropriate Username and Password credentials should be specified.
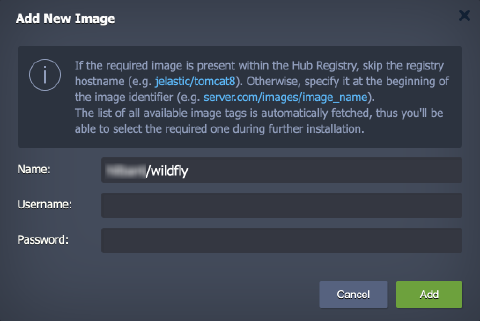 We use the public Docker Hub repository, located within the central Registry Hub, so only the short repository name is required. Click Add when ready.
- After that, your image will appear in the list. Now, it could be added to the topology with just a single click. Moreover, this template will be remembered and remain listed here so it can be easily found during the consequent environment creation processes (until you remove it from the Custom list).
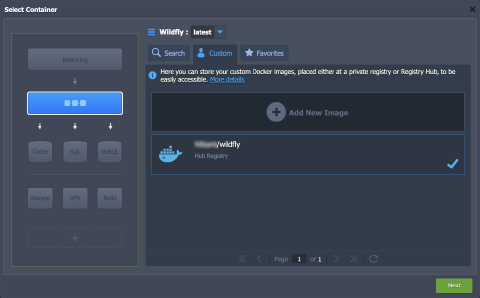 Complete the rest of the configurations on your own (the details on the available options can be read in the linked guide) and finish the environment creation.
- Once your environment with the appropriate image inside appears on the dashboard, it can be accessed using the corresponding Open in Browser button:

Note: If you haven’t placed your template in the Application Servers or Balancing environment layers, you’ll need to use the same-named button next to a particular container to open it.
As a result, you’ll see the default WildFly start page, which means everything is correctly configured and your newly created container is fully operational.
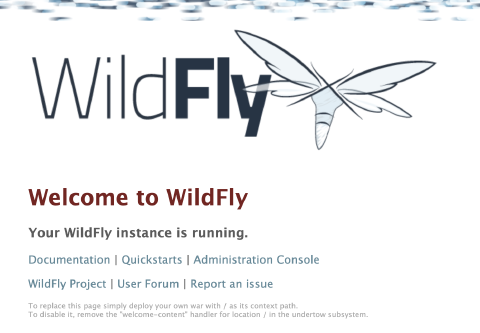 You can also access the WildFly admin panel by clicking the Administration Console link. The credentials for logging in are the ones you’ve specified within the dockerfile (admin/admin in our case). We recommend changing them to more secure ones as soon as possible.
Similarly, you can pre-configure and create any other image and, consequently, easily run it within the platform!