
Install PostGIS Extension with PostgreSQL database for GeoServer hosting.
This guide is maintained for Ruk-Com PaaS. Screens and options may vary by platform version and account permissions.
Confirm the environment, region and account permissions, and back up current settings before changing a production system.
Objective
This guide explains how to use Install PostGIS Extension with PostgreSQL database for GeoServer hosting. on Ruk-Com Cloud PaaS, with ordered procedures and practical verification points.
Before you begin
- Sign in with an account permitted to manage the relevant environment.
- Confirm the target environment, region and resources before saving changes.
- Create a backup or rollback plan before changing a production system.
PostGISIt is a spatial extension for PostgreSQL object-relational databases. This adds support for geographic objects that allow running location queries in SQL with the PostGIS extension. PostgreSQL can be used as a back-end geospatial database for GIS.
On the other handGeoServerIt is an open source Java software server used for building Share and manage geospatial data Using the open standard GeoServer publishes data from key geospatial sources. Let's learn how to extend a PostgreSQL database with PostGIS and deploy GeoServer as an Env Ruk-Com to work with shared geospatial data.
Creating the Environment
First you need to create an Env as the basis for your application.
1. Log into your Ruk-Com account, click on the Create environment button.
2. Select Tomcat 7 as your application server and PostgreSQL 9 as the database you want to use. Set a resource limit for each node and enter an Env name (e.g. geoserver). Confirm the Env creation.
3.Within a few minutes your Env will appear on the dashboard.
Deploying GeoServer
We can now proceed to deploy the GeoServer software.
1.Open link #GeoServer official web-siteand download the latest stable version from the web archive.
2.When the download is complete, extract the archive file you have.
3. Return to the Ruk-Com dashboard and upload the file. geoserver.war It is in the folder containing the extracted archive contents.
4. Finally, select Deploy to.. button next to this.war file in the package list and select Create before Env to deploy the GeoServer app.
PostGIS configuration
In this step we will add the PostGIS extension for our PostgreSQL database.
1. Open phpPgAdmin for the PostgreSQL database in your Env by pressing the Open in browser button next to it.
2. Log in with the PostgreSQL credentials you received via email after creating the Env.
3. Now you need to create a new database. For pressing the Create database button in an open window
4. Fill out the form:
- Specify a name for the new database. (in our case it's nyc)
- Select UTF8 encoding from the list.
- Fill in other fields if necessary.
Press the buttonCreate
5. Select the newly created database in the expanded list on the left-hand panel and go to the SQL tab.
6. Enter the following SQL query and execute it:
CREATE EXTENSION postgis;
CREATE EXTENSION postgis_topology;
CREATE EXTENSION fuzzystrmatch;
CREATE EXTENSION postgis_tiger_geocoder;
where the attribute is w:
- postgis: for enabling PostGIS (including raster)
- postgis_topology: for enabling topology
- fuzzystrmatch: A fuzzy match is required for Tiger.
- postgis_tiger_geocoder: For US Tiger Geocoder enabled
Note: Don't forget to check the Paginate results line under the form to avoid any errors.
It's finished! Enabling the PostGIS extension and making it usable
Importing datasets
Now let's import the PostGIS dump of the dataset into the PostgreSQL database. For example, we will use link # nyc_buildings.zip. with building datasets from New York City
1. Download the package link # nyc_buildings.zip and extract it. You will get the file. nyc_buildings.sql
2. Enter phpPgAdmin for PostgreSQL with your credentials and go to the SQL tab for the database again by expanding PostGIS (in our case the nyc database).
3. Browse to the extracted data set (such as nyc_buildings.sql) on your computer and upload it as an SQL script.
4.Check the Paginate results box.located under the exit form andExecuteScript
Connect GeoServer to the database
Now we need to connect the GeoServer application to the PostgreSQL database. We will create a storage for the nyc database.
1. Go to the Ruk-Com dashboard and open GeoServer Env (pressOpen in browser addressnext to)
2. In the opened browser tab, log in with the default GeoServer credentials. (admin/geoserver)
3. Then go toData > Storesin the left-hand panel and clickAdd new Store
4. In the windowNew data sourcePress Options.PostGIS - PostGIS Database
5. In the windowNew Vector Data Sourcethat appears, fill in the following fields:
- Basic Store Info
SelectciteIn terms ofWorkspaceFrom the input listData Source Name(For example: nyc_buildings) and a short, direct description.Description
- PostGIS databaseConnection Parameters
host– The database host can be taken from the Info button.
database- The name of the database you created with the PostGIS extension (in our case it's nyc).
userandpasswd- Credentials for PostgreSQL that you received while creating the Env state.
All other fields will be default values, they can be left as they are.
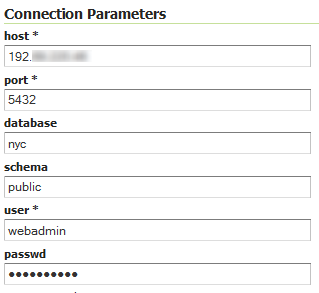
Additionally, scroll down a bit and check that it is ticked.Validate connectionsor not, then pressSave
The connection is established and as a result you can see the uploaded to PostreSQLnyc_buildingsin the list of application resources.
Publish and preview datasets
Finally, we need to do a bit more configuration to publish the dataset (such as nyc_buildings) and to make the desired geographic objects available.
1.New Vector Data Source(saved in the previous step) will appear in the list.New Layers
Press Publish next to the added layer (such as nyc_buildings).
2. In the open Edit Layer window, enterTitleandAbstractfor your resources
3. Scroll down a bit and press the button.Compute from dataandCompute from native boundsin the configuration blockBounding Boxes
4. Then switch to the Publishing tab and make sure the Layer Style is selected.polygonis the default
5. Finally, scroll down to the bottom of the page and press the Save button. The layer has been published.
6. You can now go to the Data > Layer Preview menu to see a list of all the layers configured in GeoServer, with previews available in different formats for each layer.
7. Press the OpenLayers button next to your layer. (in our case NYC buildings)
Note: You can choose a different preview mode or download your resource in a different format using the options in the list next to the desired layer.
8. So you can see the desired geographic object. In our case, this is an interactive map of buildings in New York City.
You can use the preview map to zoom and pan around and show different feature attributes. Have fun.