
MongoDB Auto-Clustering
This guide is maintained for Ruk-Com PaaS. Screens and options may vary by platform version and account permissions.
Confirm the environment, region and account permissions, and back up current settings before changing a production system.
Ruk-Com PaaS provides automatic clusterization for the MongoDB stack, which allows you to create a reliable replica set for your database with a single click. The implemented solution provides a set of benefits:
- redundancy and data high availability - multiple copies of data on different database servers offer a high level of fault tolerance against data loss
- scalability and autodiscovery – new nodes, added during horizontal scaling, are connected to the cluster with all required adjustments being applied automatically
- automated failover – the database nodes that are temporarily unavailable or have high latency are automatically excluded from the cluster and re-added once the connection is restored
 All these benefits can be achieved just in a few clicks within a topology wizard. Explore the steps below to activate auto-clustering for your MongoDB database in PaaS.
MongoDB Auto-Clustering Specifics
A replica set is a group of at least three MongoDB instances that maintain the same data. One node of the set is deemed primary and is responsible for all write operations. It records all changes in the oplog so that the remaining nodes (secondaries) can accurately reflect data on the primary. If the primary becomes unavailable, a new one will be automatically elected from the active secondaries after a short delay.
The default values for the settings of the automatically configured cluster are provided below:
- “chainingAllowed” : true - allows secondary members to replicate from other secondaries
- “heartbeatIntervalMillis” : 2000 - the frequency in milliseconds for the heartbeats
- “heartbeatTimeoutSecs” : 10 - timeout in seconds that the replica set members wait for a successful heartbeat before marking the appropriate node as inaccessible.
- “electionTimeoutMillis” : 10000 - timeout in milliseconds for detecting if the primary member is unreachable
- “catchUpTimeoutMillis” : -1 - timeout in milliseconds (-1 for infinite time) for the newly elected primary to catch up with the members that have more recent writes
- “catchUpTakeoverDelayMillis” : 30000 - timeout in milliseconds a secondary node, that is ahead of the current primary, gives for the catchup before initiating election to become a new primary
Tip: If needed, these settings can be reconfigured manually after the cluster installation using the rs.reconfig() command. Check the section below, to learn how you can connect to your MongoDB cluster via SSH and run the required commands.
Another important point is security and protection from undesired access. Authentication is an important security assurance process that forces each member of the replica set to identify itself during internal communication by means of a special unique authentication key file. The platform automatically applies required configurations (in /etc/mongod.conf) and generates a key (located at /home/Ruk-Com PaaS/mongodb.key) during the cluster configuration. Also, to ensure consistency, the file is added to the redeploy.conf file so that it remains through all the container lifecycle operations.
MongoDB utilizes the WiredTiger storage engine by default. It ensures high performance (due to non-locking algorithms) and effective cost/resource utilization. The default options for WiredTiger are optimized to run a single mongod instance per server, which is also suitable for the platform containers. MongoDB utilizes both the WiredTiger internal cache and the filesystem cache. The internal cache size is 50% of total RAM minus 1 GB (but no less than 256 MB), while filesystem cache operates free memory that is not used by WiredTiger or other processes. For more information on WiredTiger configs, refer to the official MongoDB documentation.
One more unique feature of the MongoDB auto-cluster is the automated detection of new nodes added through horizontal scaling and their inclusion into the replica set without any manual actions. Similarly, nodes are excluded from the cluster while scaling in.
Creating MongoDB Cluster
The whole process of the MongoDB auto-cluster creation can be done in a few simple clicks.
- Open the topology wizard with the New Environment button at the top-left corner of the dashboard, choose MongoDB database, and activate Auto-Clustering via the appropriate switcher.
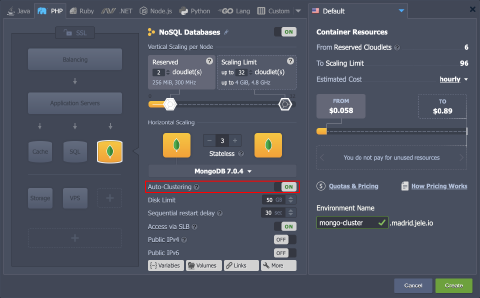
Tip: Some of the topology specifics of the MongoDB cluster are listed below:
- 4 GiB of RAM (32 cloudlets) are recommended for the proper work of the replica set nodes. By default, these number of cloudlets are added as a dynamic scaling limit, so you won’t be charged unless resources are actually consumed.
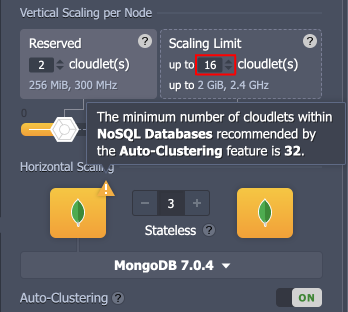 * the minimum number of nodes required for the MongoDB auto-cluster is 3
Configure other parameters up to your needs (public IPs, region, etc.) and click Create.
- Wait a few minutes for the platform to configure the cluster for you.
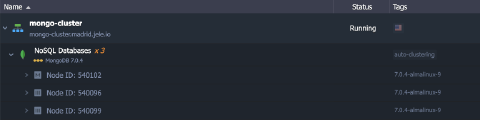 3. After the installation, you’ll receive an email with the replica set credentials:
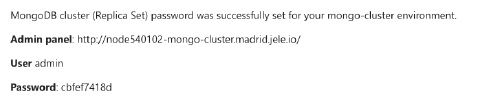 You can use these credentials to access the admin panel or to establish connections from your applications to the primary node of the replica set.
Tip: As it was mentioned, any secondary node may become primary in case of failure. Also, election will happen if the cluster is restarted, and it is possible that a new primary node will arise. So, the application connection string becomes invalid. To avoid any of these issues the connection string should contain a replica set name, all of the member hostnames, and read preferences (if necessary to unload the primary node to handle the reads or to ensure cluster high availability and failover).
Here is the connection string example for node.js application:
Copy
client = new MongoClient("mongodb://admin:[email protected]:27017,node540096-mongo-cluster.madrid.jele.io:27017,node540099-mongo-cluster.madrid.jele.io:27017/admin", {useUnifiedTopology: true, readPreference:'primaryPreferred',replicaSet:'rs0'});
Where:
- useUnifiedTopology: true - forces mongodb to use the new Server Discover and Monitoring engine.
- readPreference:‘primaryPreferred’ - operations read from the primary but if it is unavailable, operations read from secondary members.
- replicaSet:‘rs0’ - by default the replica set name is rs0 on the platform. You may observe the replica set name at any cluster node in the mongod.conf file or in the mongo shell prompt.
The outlined above application connection is considered to be established within one hosting platform. But if required, you can make an external application connection to the replica set through SLB. In this case you have to maintain a connection to the primary node only for read/writes via endpoints.
 If you need to read from the secondaries you have to customize your application code to perform reading from secondaries in a separate thread as you do it for primary. Anyway, for such cases, you have to remove replicaSet parameter from the connection string so it can look as follows:
Copy
client = new MongoClient( "mongodb://admin:[email protected]:11013/admin", { useUnifiedTopology: true });
- By default, the auto-cluster utilizes the Mongo Express administration panel that provides support for the replica sets.
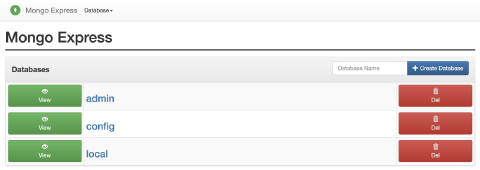 5. Also, you can connect to your database via the mongo shell directly in your terminal (for example, using the built-in Web SSH option).
Copy
mongosh -u {user} -p {password} {DB_name}
Tip: If working with older database versions, use the mongo command (for MongoDB 3.x, 4.x) instead of mongosh (for MongoDB 6.x, 7.x) with the same parameters.
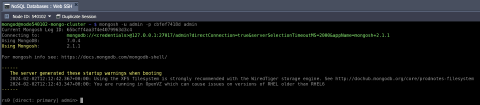 Where:
- {user} – administrator username (sent to your email, admin by default)
- {password} – password for the corresponding DB user (can be found within the same email)
- {DB_name} – name of the database you would like to access (we’ll use the default admin one)
- You can check the replica set status with the appropriate command:
Copy
rs.status()
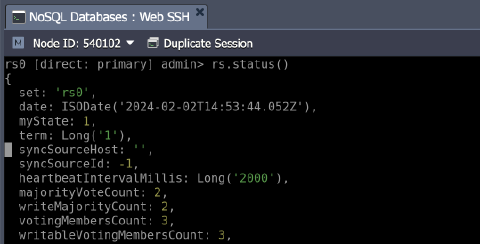 As you can see, the replica set (with the default rs0 name) is up and running. Other replica set commands can be found in the official documentation. For example, use the rs.conf() operation if you want to see replica set configs.