
MySQL/MariaDB Database Master-Slave Replication
This guide is maintained for Ruk-Com PaaS. Screens and options may vary by platform version and account permissions.
Confirm the environment, region and account permissions, and back up current settings before changing a production system.
Objective
This guide explains how to use MySQL/MariaDB Database Master-Slave Replication on Ruk-Com Cloud PaaS, with ordered procedures and practical verification points.
Before you begin
- Sign in with an account permitted to manage the relevant environment.
- Confirm the target environment, region and resources before saving changes.
- Create a backup or rollback plan before changing a production system.
Master-Slave replication is used to solve various performance issues. It supports backups of different databases and is part of a larger solution to reduce system failures. It allows data to be replicated from a database server (master) to one or more database servers (slaves). The master logs updates, which are sent to the slave. The slave displays a message indicating that the update was successful, which allows the update to be sent later. Master-Slave replication can be synchronous or asynchronous. The difference is only in the timing of the propagation of the change. If changes occur to the master and slave at the same time, they are synchronous. If changes are queued and written later, they are asynchronous.
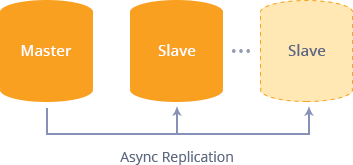
Usage goals for replication in MariaDB and MySQL databases include:
- Scale-out solution
- data security
- Analysis
- long-distance data distribution
How can you use such simulation and take advantage of it?
- Backups: To use replication as a backup solution, replicate data from the master to the slave and then back up the slave, where the slave can be paused and shut down without affecting the master's operation, so you can effectively create a snapshot of "live" data that would otherwise require the master to be shut down.
- Scale-out: You can use replication as a scale-out solution, that is, where you want to divide the workload of many database queries across multiple database servers within reasonable limits. Because replication works from distributing one master to one or more slaves, it is used for scale-out. It works best on Envs where you have high read counts and few writes/updates.
- Spreading the load: There may be situations when you have a single master and want to replicate different databases to different slaves. For example, you may want to distribute sales data to only necessary departments to help spread the load during data analysis.
- Increasing the performance: As the number of slaves connected to the master increases, the workload is minimal. But this also increases as each slave shares the client connection with the master. Because each slave must receive a complete copy of the log binaries, the network load on the master can increase and create bottlenecks. If you use many slaves connected to one master and that master is also processing requests (for example, as part of a scale-out solution), you may want to improve the performance of the replication process. One way to improve the efficiency of the replication process is to create a deeper replication structure that allows the master to replicate as a single slave and the remaining slaves to connect to the master slave for their replication requirements.
- Failover alleviating: You can set up a master and slave (or multiple slaves) and write a script that checks the master to see if it fails. Then instruct the application and slaves to change master in case of failure.
- Security: You can use SSL to encrypt required binary log transfers during replication, but both the master and slave must support an SSL network connection. If a host does not support an SSL connection, replication over an SSL connection will not be possible. Setting up replication using an SSL connection is similar to setting up servers and clients using SSL. You need to obtain (or create) appropriate security certificates, which you can use with master and similar certificates. (from the same certificate authority) on each slave
Let's now look at a simple example of how to configure Master-Slave replication on a Ruk-Com PaaS.
You can set up a database cluster in two ways:
- automatically(via one-click widget)
- manually(Follow the step-by-step instructions)
One-Click Installation
You can get a MySQL or MariaDB database cluster with the desired replication type (including a master-slave one) up and running within minutes using the Ruk-Com one-click install widget.
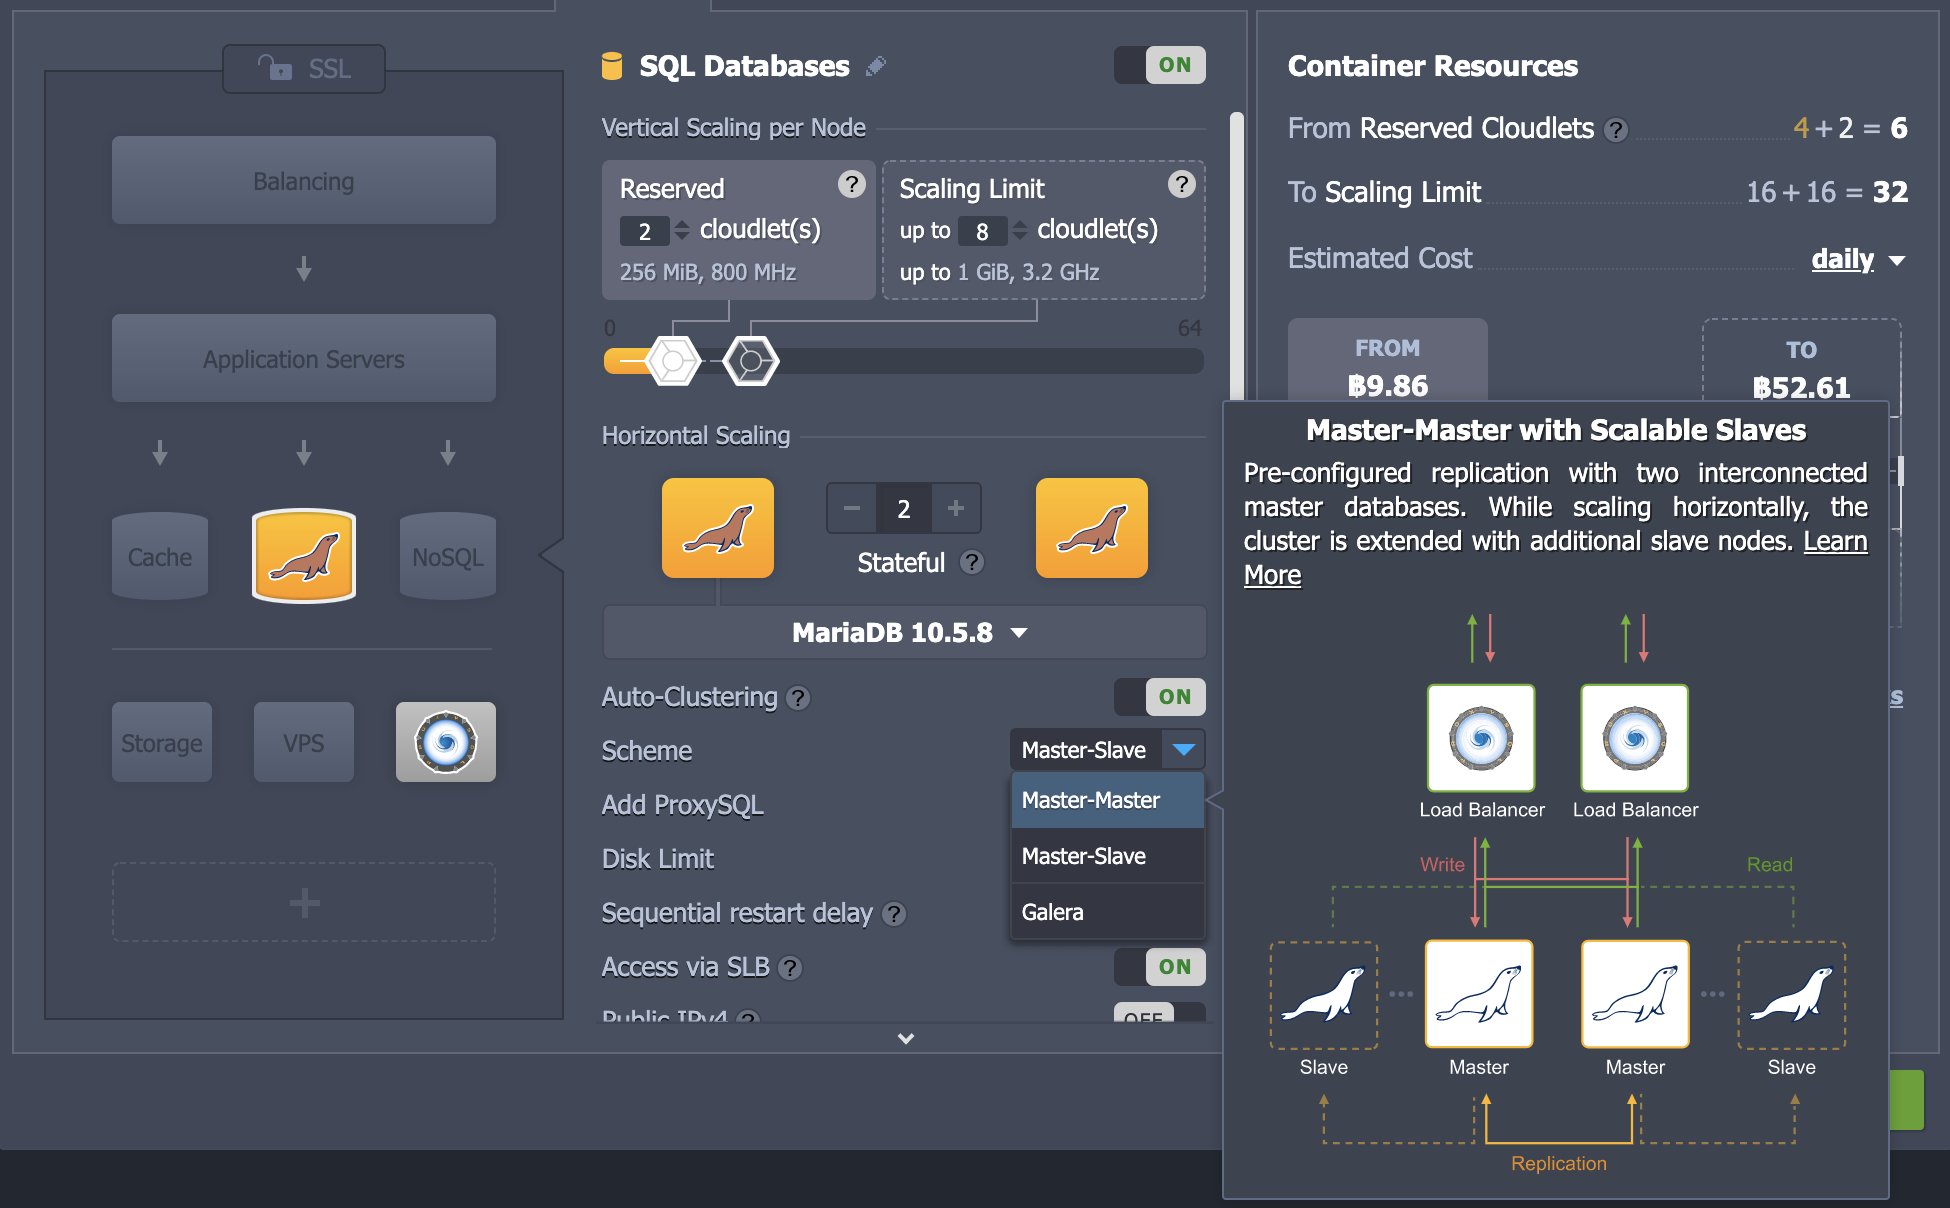
The process is very simple, just enter your email and confirm via notification. Read the article.MariaDB / MySQL Auto-ClusteringFor more information about installed packages and available customization options,
Self-installation
If you want to manually configure Master-Slave replication to get additional Slave replicas or specify some custom configuration. Please follow the instructions below.
Tip : The instructions below are especially suitable for MySQL and MariaDB database servers.
First you need to create 2 Envs in Ruk-Com for the master database and slave database.
- Log in to the Ruk-Com dashboard and click the New Environment button.

- In the Env Topology wizard, select MariaDB (or MySQL) as the database you want to use, set the cloudlet limits, and type the name of your first Env, for example masterbase.
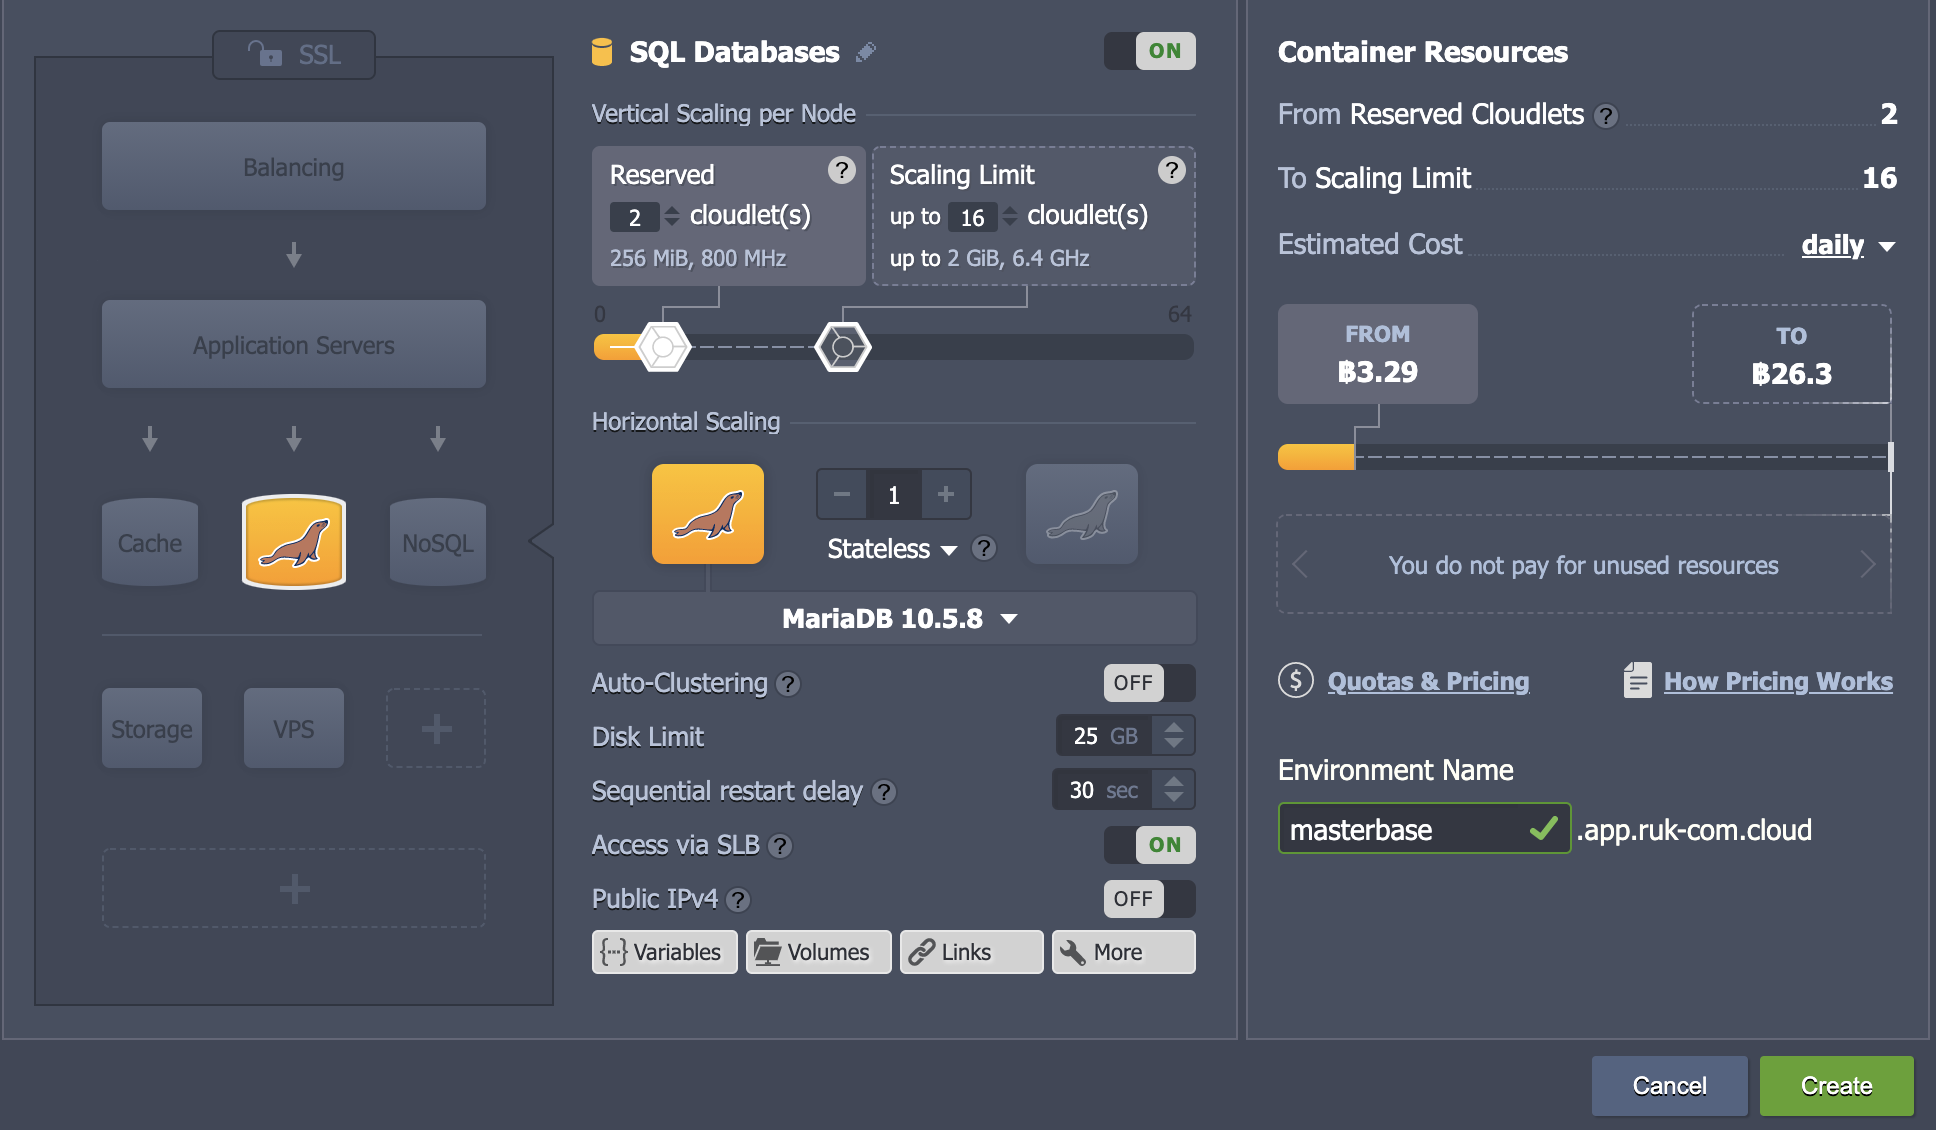
Wait a moment for the Env to be created.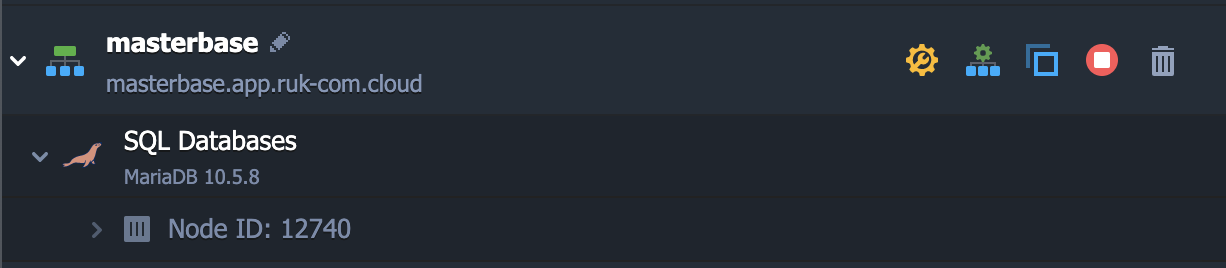
- Similarly, rebuild the Env with MariaDB or just clone it. Let's name it, the slavebase will be on another hardnode which is more secure and reliable for data storage.
Now you have 2 Envs that are same for both databases.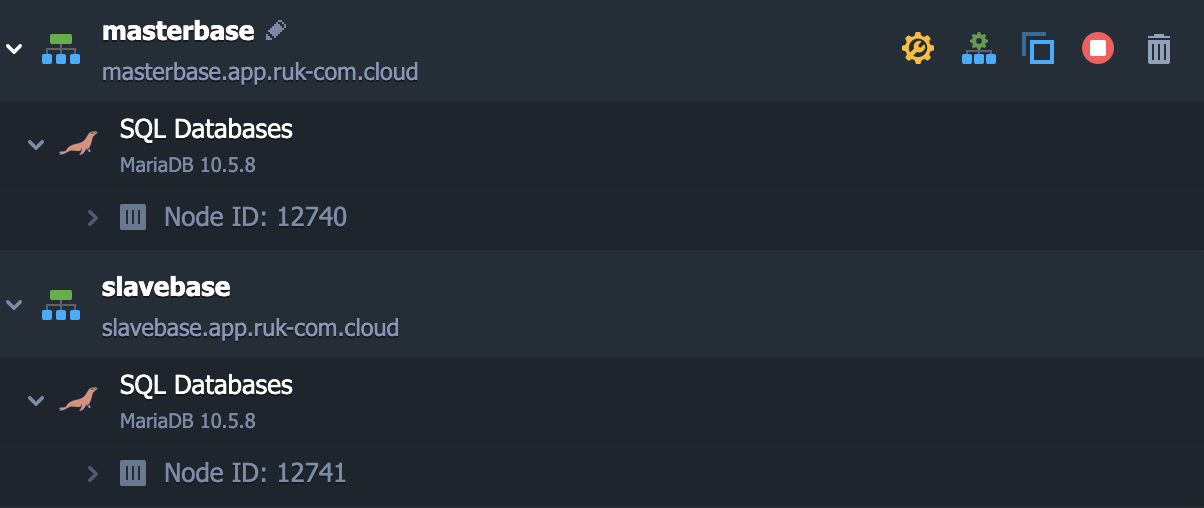
Let's configure the master base.
- Click the Config button for the master database.
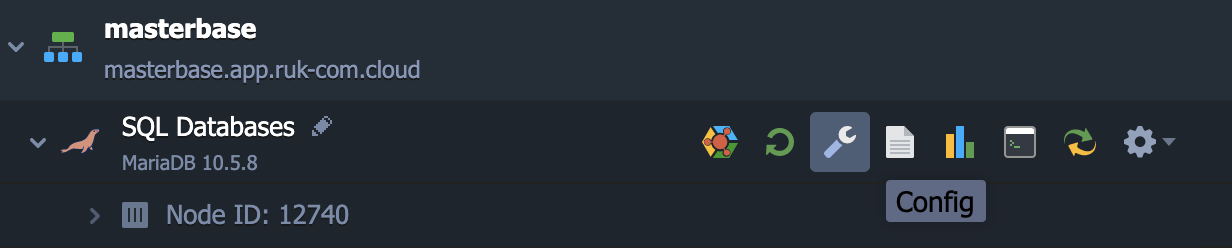
- Go to the my.cnf file and add the following properties as shown below:
server-id = 1
log-bin = mysql-bin
binlog-format = mixed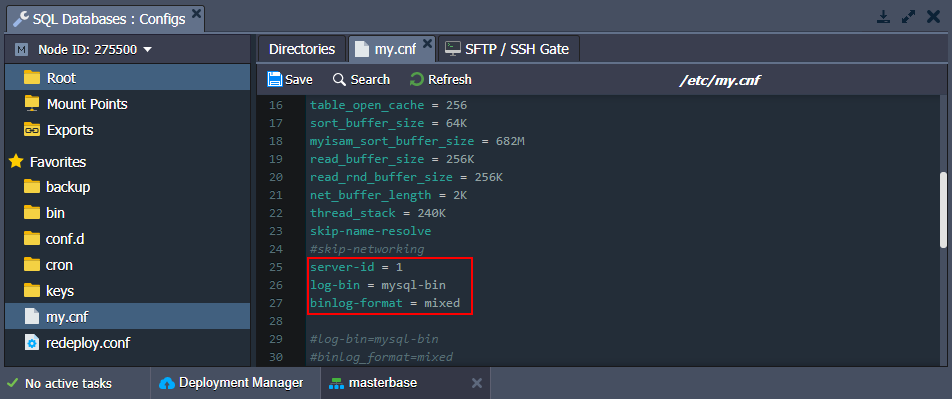
We use a “mixed” binlog format (binlog-format = mixed) to be able to simulate working with foreign keys.
Note: Do not use the “statement” binlog format or you will get an error later!
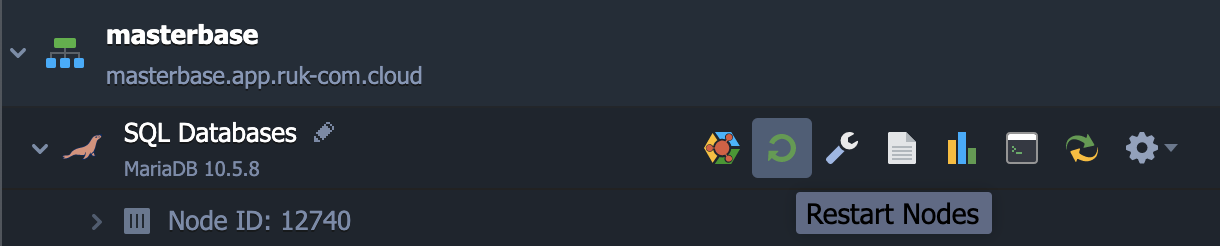
- Save changes and Restart MariaDB to use the newly configured parameters.
- Click the Open in Browser button for MariaDB, Ruk-Com will email you with credentials to the database to log in using these credentials.
- Go to the User accounts tab and click Add user account.
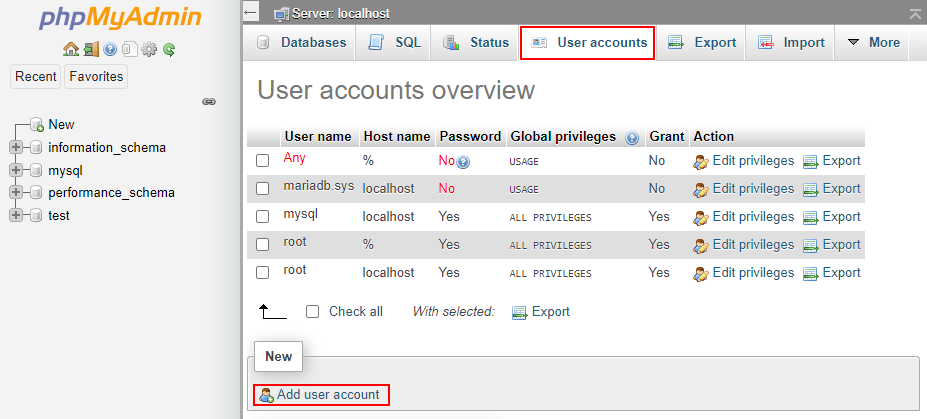
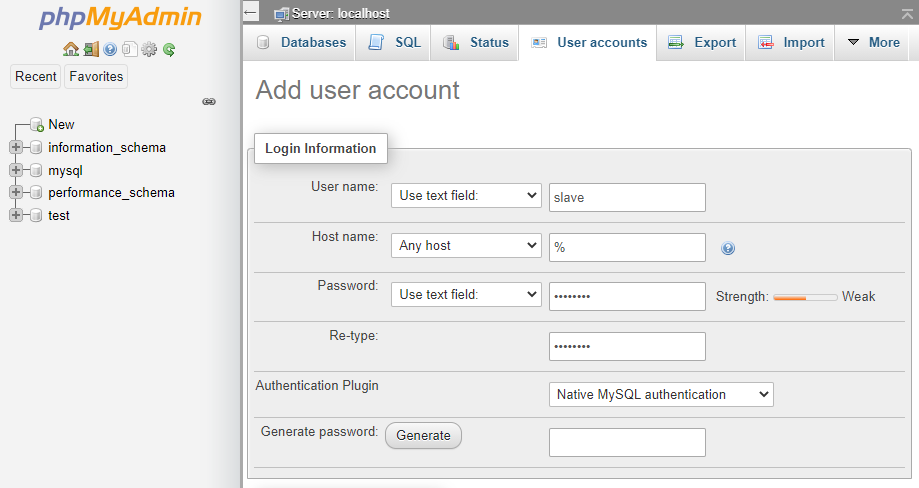
- Specify the name and password for the slave replication user.
Now scroll down and check replication client and replication slave in the administration privileges section.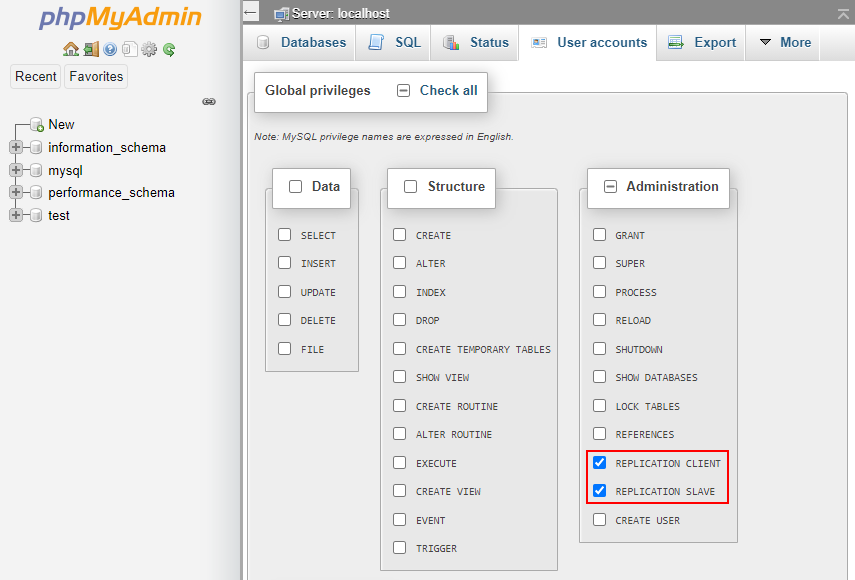
Click Go at the bottom of the page.
- Switch to the Status tab to ensure that the simulation is configured correctly.
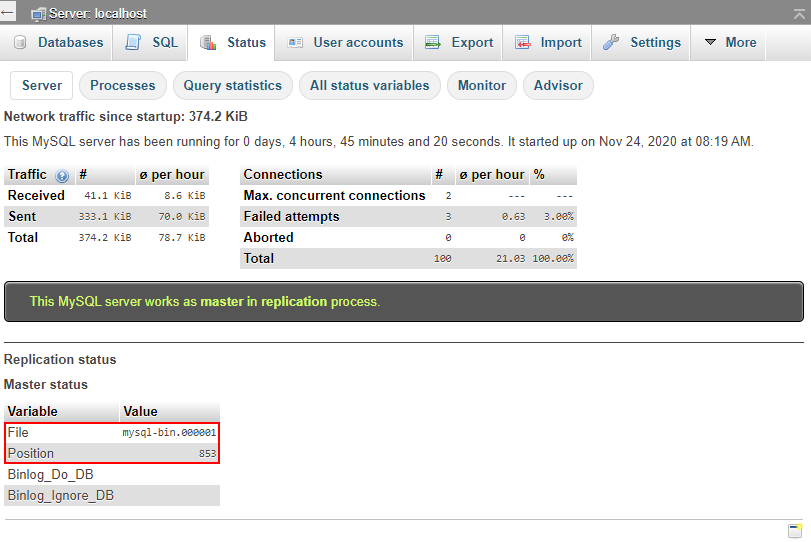
Pay attention to the Log File and Position values as they will be needed later to set up the Slave database.
Return to the Ruk-Com dashboard and configure the Slave database.
- Click the Config button for Slavebase Env.
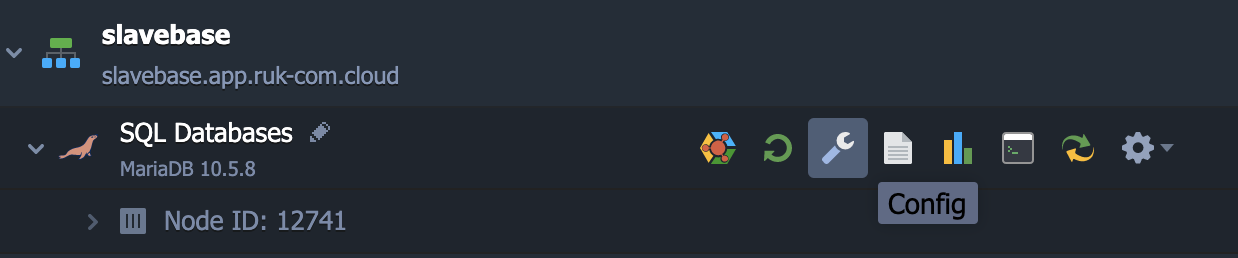
- Go to the my.cnf file and add the following string:
server-id = 2
slave-skip-errors = all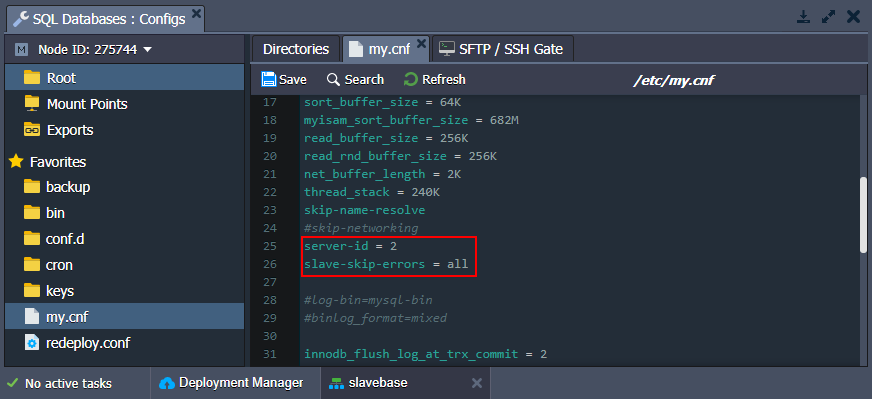
We allow the slave base to skip all errors from the master (slave-skip-errors = all) so as not to stop the normal slave in the event of an error on the master base.
Note: It is not recommended to use this skip during the development process as it helps in finding and fixing bugs. However, in actual use (Once your code is tested) it helps avoid minor out-of-synchronization issues on the master node.
- Then open the file /etc/phpMyAdmin/config.inc.php and append it with the next code:
$cfg['AllowArbitraryServer'] = true;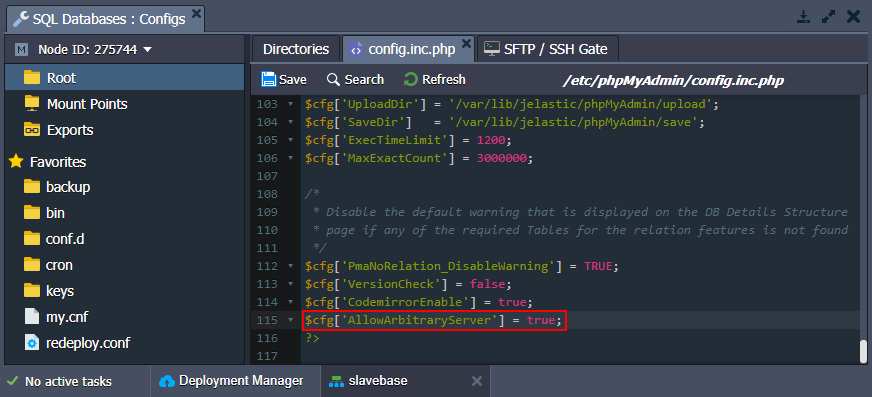
- Save changes and Restart the slave database server to use the new configuration parameters.

- Let's configure the slave database server viaWeb SSHBuilt-in client connects to your database using credentials from the email received after node creation.
mysql -u root -p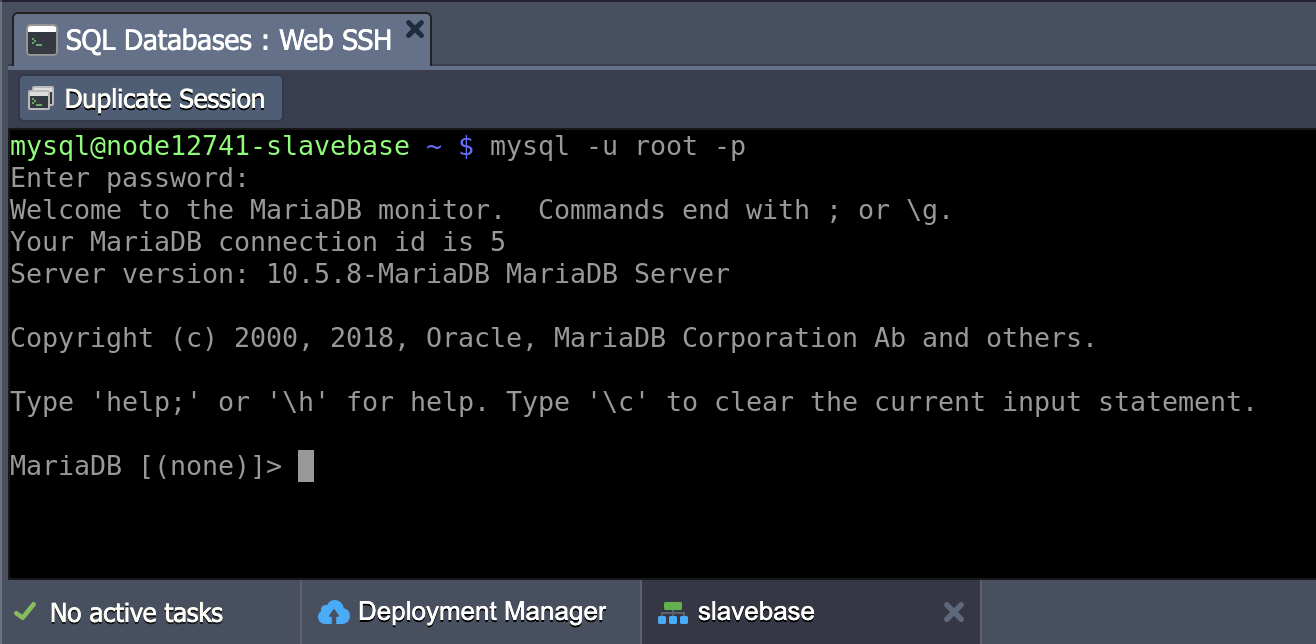
- Provides master replication details.
CHANGE MASTER TO
MASTER_HOST='node.example.ruk-com.cloud',
MASTER_USER='slave',
MASTER_PASSWORD='passw0rd',
MASTER_LOG_FILE='mysql-bin.000001',
MASTER_LOG_POS=853;
Be sure to replace the option's value in the example above with the correct information:
- MASTER_HOST - master replication URL or IP
- MASTER_USER - Replication user
- MASTER_PASSWORD - Password of the simulation user.
- MASTER_LOG_FILE – master log file (see last step of master configuration section)
- MASTER_LOG_POS – master log location (see last step of master configuration section)
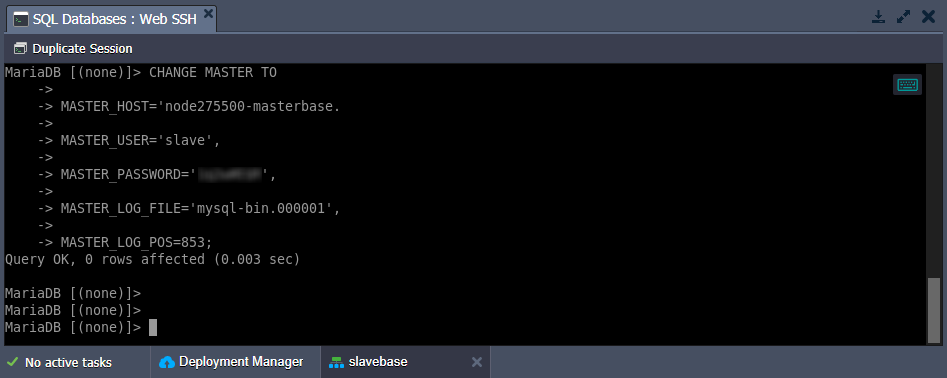
- You can now start slave replication with the appropriate command:
start slave;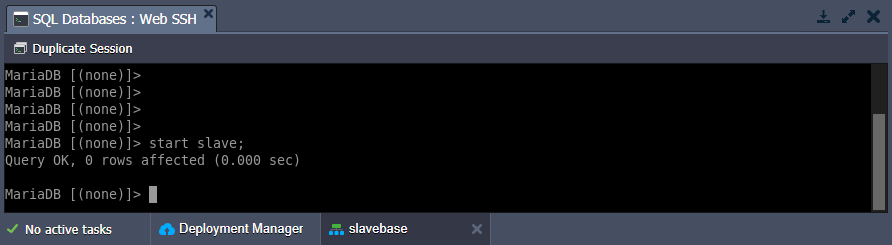
Tip: If you want to make sure everything is configured correctly, log in to the slave database for admin section and go to the Status tab.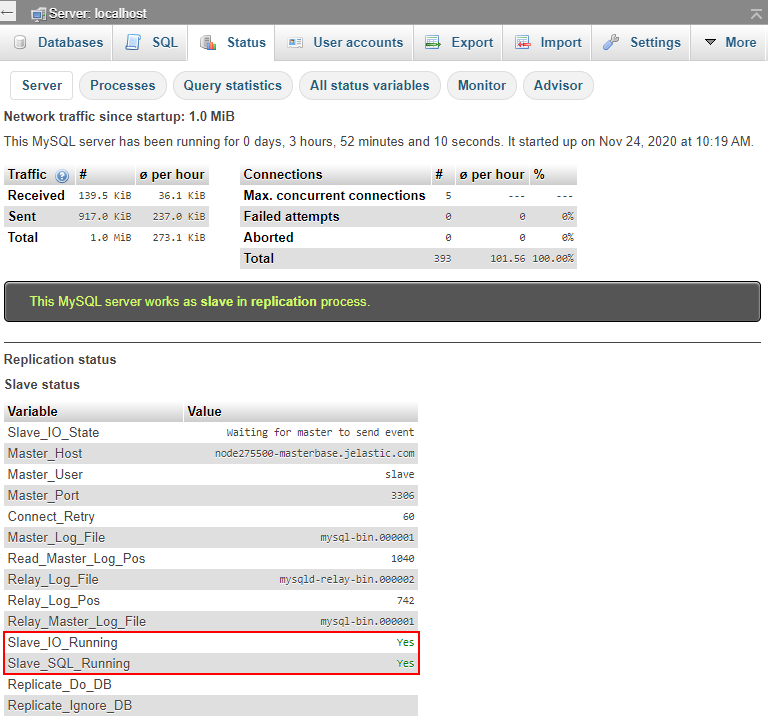
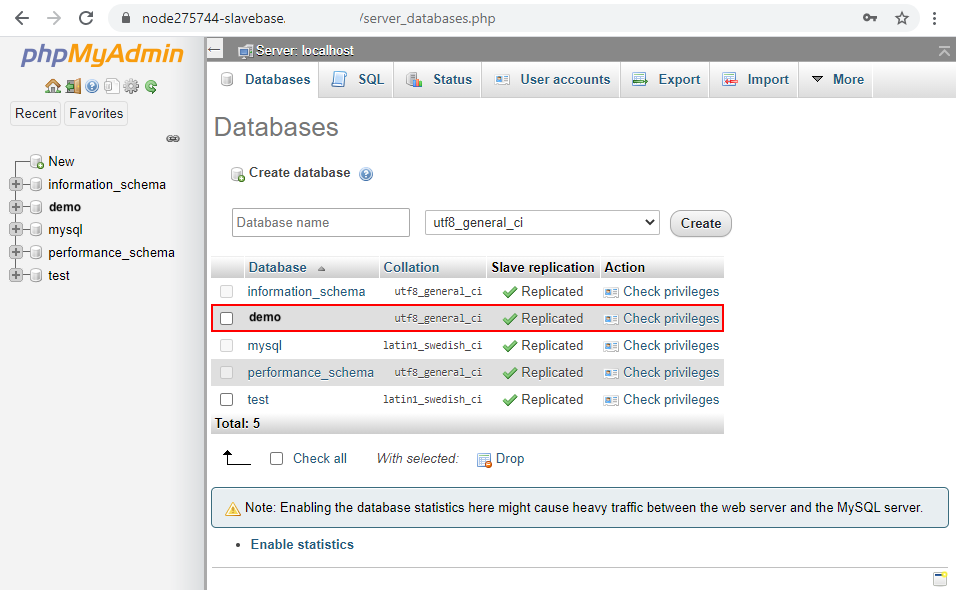
We need to make sure that master-slave replication is working for our database.
- Let's create a new database (such as Ruk-Com) in our master base.
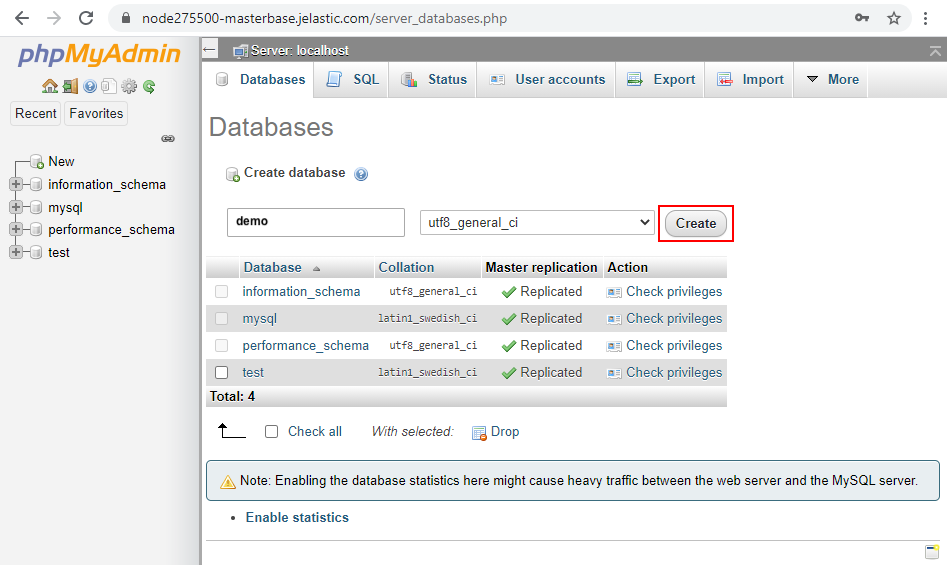
- Go to slave base and you will see that the new database has been successfully replicated.
Here are 2 examples of connecting to master database and slave database from Java and PHP applications.
- For example, you can view the code of your Java application which connects to the master database and slave database Database_config.cfg:
master_host=jdbc:mysql://mariadb-master-host/mysql
master_username=root
master_password=abcABC123

slave_host=jdbc:mysql://mariadb-slave-host/mysql
slave_username=root
slave_password=abcABC123

driver=com.mysql.jdbc.Driver
Dbmanager.java:
package com.jelastic.test;
import java.io.FileInputStream;
import java.io.IOException;
import java.sql.*;
import java.util.ArrayList;
import java.util.List;
import java.util.Properties;
import java.util.logging.Level;
import java.util.logging.Logger;

public class DbManager {

    private final static String createDatabase = "CREATE SCHEMA IF NOT EXISTS jelastic";
    private final static String showDatabases = "SHOW DATABASES";

    public Connection createMasterConnection() throws IOException, ClassNotFoundException, SQLException {
       Connection masterConnection;
       Properties prop = new Properties();
       prop.load(new FileInputStream(System.getProperty("user.home") + "/database_config.cfg"));
       String master_host = prop.getProperty("master_host").toString();
       String master_username = prop.getProperty("master_username").toString();
       String master_password = prop.getProperty("master_password").toString();
       String driver = prop.getProperty("driver").toString();

       Class.forName(driver);
       masterConnection = DriverManager.getConnection(master_host, master_username, master_password);
       return masterConnection;
    }

    public Connection createSlaveConnection() throws IOException, ClassNotFoundException, SQLException {
       Connection slaveConnection;
       Properties prop = new Properties();
       prop.load(new FileInputStream(System.getProperty("user.home") + "/database_config.cfg"));
       String slave_host = prop.getProperty("slave_host").toString();
       String slave_username = prop.getProperty("slave_username").toString();
       String slave_password = prop.getProperty("slave_password").toString();
       String driver = prop.getProperty("driver").toString();

       Class.forName(driver);
       slaveConnection = DriverManager.getConnection(slave_host, slave_username, slave_password);
       return slaveConnection;
    }

    public boolean runSqlStatementOnMaster() {
       boolean execute = false;
       Statement statement = null;
       try {
           statement = createMasterConnection().createStatement();
           execute = statement.execute(createDatabase);
       } catch (IOException ex) {
         Logger.getLogger(DbManager.class.getName()).log(Level.SEVERE, null, ex);
       } catch (ClassNotFoundException ex) {
         Logger.getLogger(DbManager.class.getName()).log(Level.SEVERE, null, ex);
       } catch (SQLException ex) {
           ex.printStackTrace();
       } finally {
           if (statement != null) {
               try {
                   statement.close();
               } catch (SQLException e) {
                   e.printStackTrace();
               }
           }
       }
       return execute;
    }

    public List<String> runSqlStatementOnSlave() {
       List<String> stringList = new ArrayList<String>();
       Statement statement = null;
       ResultSet resultSet = null;
       try {
           statement = createSlaveConnection().createStatement();
           resultSet = statement.executeQuery(showDatabases);
           while (resultSet.next()) {
               stringList.add(resultSet.getString(1));
           }
       } catch (IOException ex) {
         Logger.getLogger(DbManager.class.getName()).log(Level.SEVERE, null, ex);
       } catch (ClassNotFoundException ex) {
         Logger.getLogger(DbManager.class.getName()).log(Level.SEVERE, null, ex);
       } catch (SQLException ex) {
           ex.printStackTrace();
       } finally {
           if (resultSet != null) {
               try {
                   resultSet.close();
               } catch (SQLException e) {
                   e.printStackTrace();
               }
           }
           if (statement != null) {
               try {
                   statement.close();
               } catch (SQLException e) {
                   e.printStackTrace();
               }
           }
       }
       return stringList;
    }
}- Connecting to master and slave databases for PHP applications
<?php
/* Master settings */
$master_server = "xx.xxx.x.xx";
$master_username = "root";
$master_password = "abcABC123";

/* Slave settings */
$slave_server = "xx.xxx.x.xx";
$slave_username = "root";
$slave_password = "abcABC123";

$link_to_master = mysqli_connect(
$master_server,
$master_username,
$master_password,
'mysql');

if (!$link_to_master) {
printf("Unable to connect master database server. Error: %s\n", mysqli_connect_error());
exit;
}

$link_to_slave = mysqli_connect(
$slave_server,
$slave_username,
$slave_password,
'mysql');

if (!$link_to_slave) {
printf("Unable to connect slave database server. Error: %s\n", mysqli_connect_error());
exit;
}

print("
Creating database with name Jelastic on Master node ");

$result = mysqli_query($link_to_master, 'CREATE DATABASE JelasticX');

sleep (3);

print("
Checking if created database was replciated to slave ");

if ($result = mysqli_query($link_to_slave, 'SHOW DATABASES LIKE "JelasticX"')) {
$result_text = mysqli_fetch_array($result);
print ("
Replicated database is ".$result_text[0]);
}

mysqli_close($link_to_master);
mysqli_close($link_to_slave);
?>
You now have a replica of your own database in the cloud. Have fun with it!