
Using phpMyAdmin
This guide is maintained for Ruk-Com PaaS. Screens and options may vary by platform version and account permissions.
Confirm the environment, region and account permissions, and back up current settings before changing a production system.
Objective
This guide explains how to use Using phpMyAdmin on Ruk-Com Cloud PaaS, with ordered procedures and practical verification points.
Before you begin
- Sign in with an account permitted to manage the relevant environment.
- Confirm the target environment, region and resources before saving changes.
- Create a backup or rollback plan before changing a production system.
Ruk-Com PaaS allows managing access to the PHPMyAdmin panel for database servers. MySQL, MariaDB and PerconaDB freely
By default, connections to phpMyAdmin are open to all. If you want to limit access rights, you can edit the file./etc/httpd/conf.d/phpMyAdmin-jel.confand search for <Directory /usr/share/phpMyAdmin/>
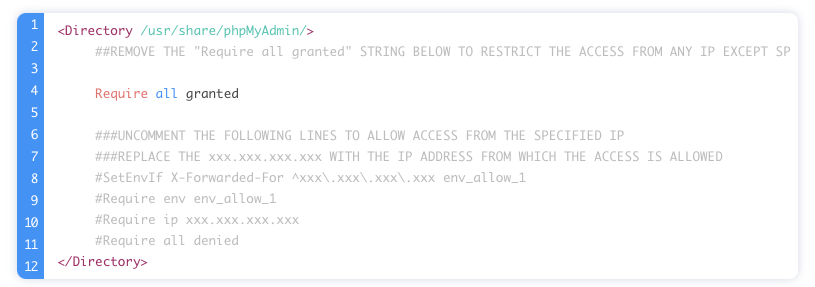
Let's take a look at it step by step.
1. In order to set permissions to access phpMyAdmin, it is necessary to edit the system config as follows.
2.Next, list the allowed IPs, which should be specified in the following format.
- If the database node haspublic IPYou can enter the exact IP.
- In case there is nonePublic IPneed to add X-Forward-For To know the IP that is called through Apache Web Server.

In this case, it should be specified{ipAddress}in form^xxx.xxx.xxx.xxxTo get correct Apache processing, variable names can also be used.{varName}can be any as desired, such as env_allow_1
If you want to allow more than 1 IP, you can do so as shown in the picture below.
3. It is necessary to have Require all denied in the last line to block other IPs that are not in the List.
4. Save changes and restart the database server node.

That's it! Other connections to the phpMyAdmin panel from IP addresses that are not in the allowed list. You will be taken to a page similar to the image below.
You can now ensure that your database admin panel is protected from unauthorized connections.