
Group Creation
This guide is maintained for Ruk-Com PaaS. Screens and options may vary by platform version and account permissions.
Confirm the environment, region and account permissions, and back up current settings before changing a production system.
Setting new environment group involves creation of a special tag, that subsequently can be attached to the required environment to logically mark it within the dashboard. You can use any naming paradigm that would be convenient for you - for example, if having development, testing, and production versions of a project, you can apply such tags to the corresponding environments to easily separate them.
So, to quickly create an environment group with only a few minutes notice, follow the next steps.
- Open your platform dashboard and click the "+" (Create New) button within the Env Groups panel at the top.

Tip: Alternatively, you can access the same option via the expandable Env Groups menu:
- select the Create New point
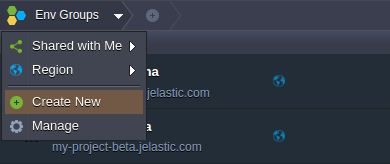 * choose Manage and click on the Add button within the opened frame
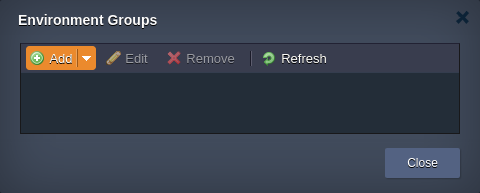
- The appropriate Add Group dialog box will be opened.
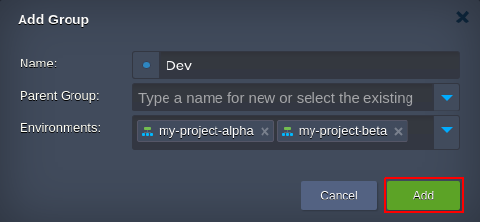 Specify the following data in order to create a new group:
- Name - type a name for your group (any letters, numbers and special characters can be used including space)
- Parent Group - optionally, specify nesting for the currently created group to be included to another one as a subgroup
- Environments - select environments that should belong to the group (shared environments cannot be added to your personal groups); also, it is possible to create an empty group and fill it up with environments later on
Tip: To enhance visual recognition of groups within the dashboard, you can assign different color to each of them by clicking the circled button near group name.
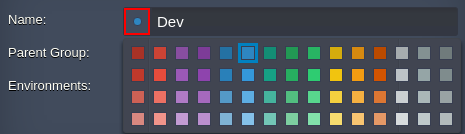
Once you are finished, click Add.
- The newly created group will be automatically selected and displayed as a new element on the top Env Groups navigation panel. The list of shown environments will be also filtered correspondingly.
 Additionally, learn the ways you can manage your environment groups and quickly navigate between them within dashboard.