
Container Firewall Rules Management
This guide is maintained for Ruk-Com PaaS. Screens and options may vary by platform version and account permissions.
Confirm the environment, region and account permissions, and back up current settings before changing a production system.
Objective
This guide explains how to use Container Firewall Rules Management on Ruk-Com Cloud PaaS, with ordered procedures and practical verification points.
Before you begin
- Sign in with an account permitted to manage the relevant environment.
- Confirm the target environment, region and resources before saving changes.
- Create a backup or rollback plan before changing a production system.
The Container Firewall feature allows you to control node availability both inside and outside the platform. It analyzes various parameters (such as incoming request source, protocol, target node port, etc.) to flexibly manage access to your containers through setting necessary connection rules.
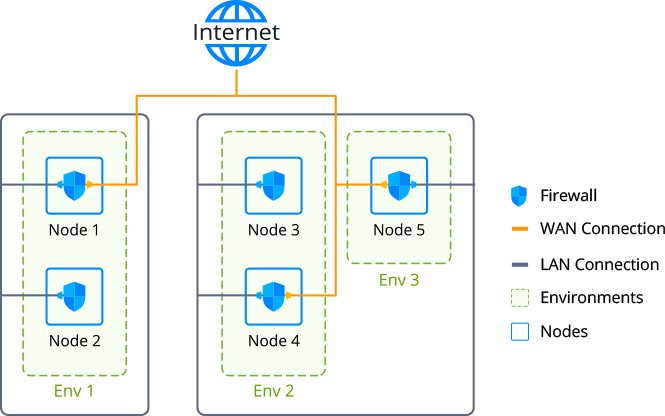
Tips:If you want to limit access to an environment to a single account, you can configure it automatically through the feature.Network Isolation
Managing Container Firewall through the UI
Each node at Ruk-Com cloud PaaS (except for containers that useDockerandWindows) provides a set of firewall rules that can be monitored and managed through an intuitive graphical user interface. The appropriate section can be accessed by clicking on the button.Settingsnext to the desired environment and select the menufirewall
Note:Availability ofContainer Firewall UIIt depends on your hosting provider's settings. If this section is not available please contact your service provider to enable the feature for your account.
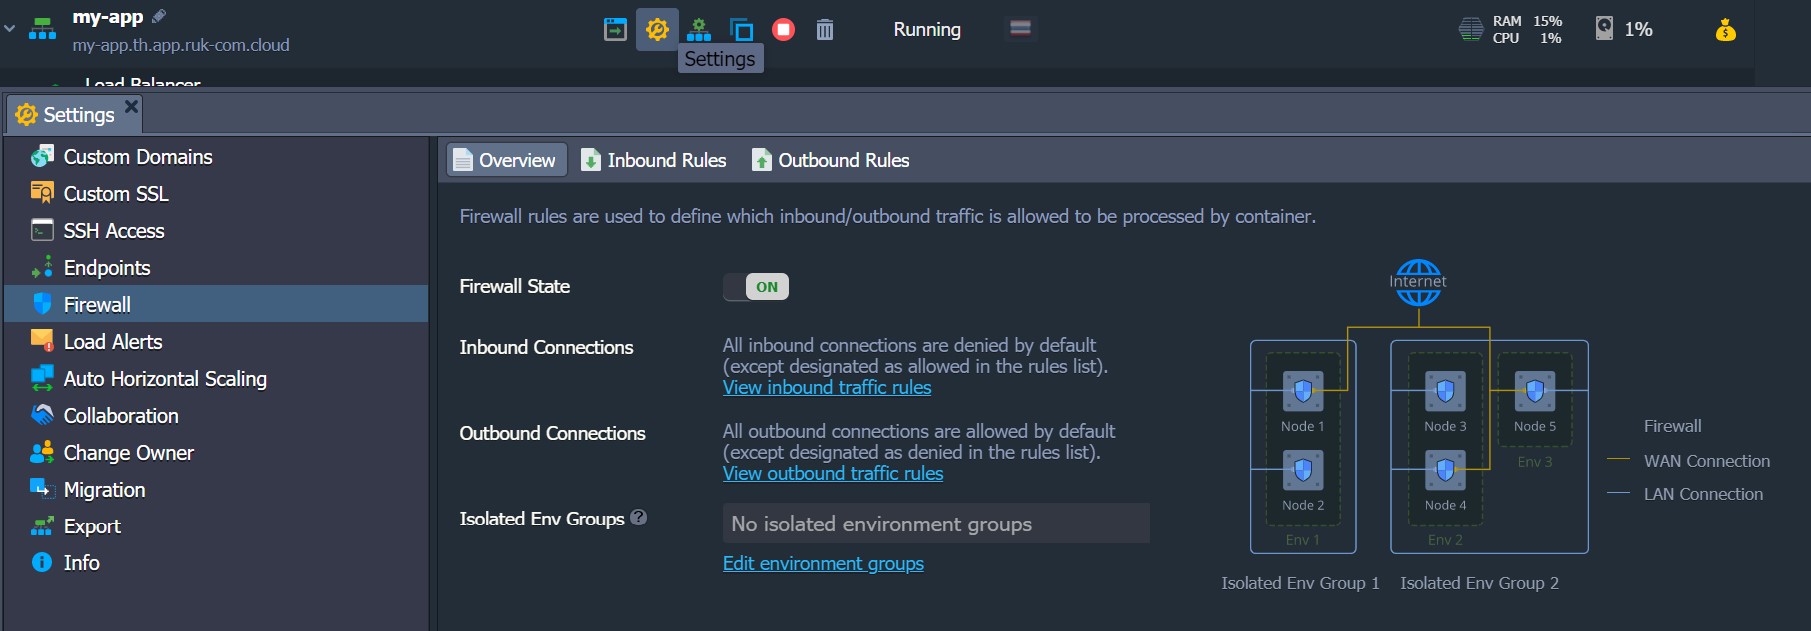
It has the following tabs:
- Overview- Contains general information for the Allow Firewall State Change feature. (This is enabled for all containers by default) and shows Isolated Env Groups that include the current environment.
- Inbound Rules- Allows to manage incoming requests (Not on the default reject list)
- Outbound Rules- Allows controlling outgoing connections (Not in the whitelist by default)
Default firewall rules
When you create a new container, the system automatically populates some of the Inbound and Outbound rules required for proper container usage.
Tips:These rules are automatically retrieved based on the port.EXPOSEfrom variables with the same name inimage’s dockerfilePlease see more details about creating docker images with Ruk-Com Cloud PaaS.
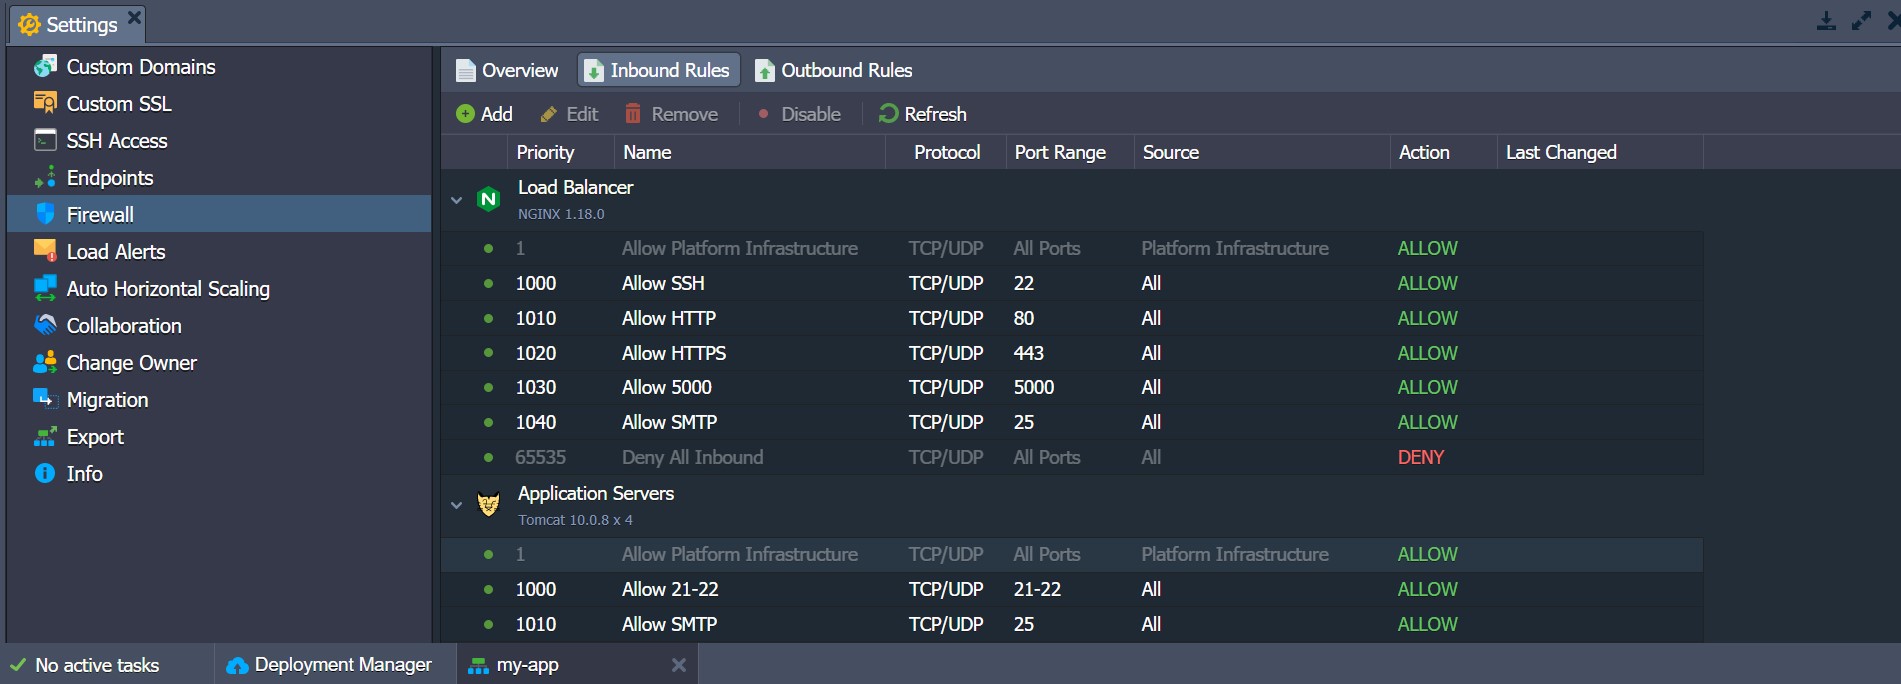
Here, Rules are grouped by layers and have the following structure:
- The first gray box (i.e. Uneditable/Lawful) has the highest priority.(1)and allow the Ruk-Com cloud infrastructure to access the container from:
- platform orchestratorTo manage all internal operations (e.g. password reset, configuration, executing CS scripts, SSH key generation, etc.)
- SSH Gate and Web SSHProvide access to appropriate services
- Default (relevant stack) and user added rules (by environment owner or collaborators)
Note:Use default rule changes only if you know what you are doing because this recording is required to ensure appropriate stack-specific behavior to provide supported features (e.g., allowSSH,HTTP,HTTPSor FTP connection)
- Gray fields that cannot be edited (always the last one Because the lowest priority is 65535) it blocks incoming connections which are not allowed through the rules mentioned above.
While working with containers (such as adding mount points, installing FTP add-ons, etc.), the platform can automatically reinforce firewall rules based on new requirements. Here each default record is added with a 10-point priority step to allow insertion of custom rules.
Adding default container rules
If necessary (for example, for an automation solution), you can use variables.Ruk-Com PaaS_PORTSto customize the ports which should be opened through the firewall container during creation of the appropriate node.
1. ClickNew EnvironmentIn the dashboard select the desired software stack and go toVariablesto configure
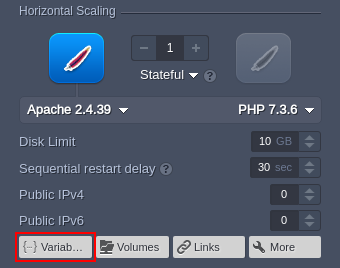
2. Specify the Ruk-Com PaaS_PORTS variable. New in the following formats:
"JELASTIC_PORTS": "{port1}, {port2}, ... , {portN}"where{portN}It is a specific port (1234) or range (33062-34000) which is exposed within inbound firewall rules. (via both tcp and udp protocols) after creating the container
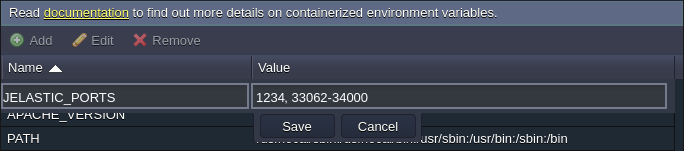
Note:changes due to variables Ruk-Com PaaS_PORTS It is applied only once during node installation. Therefore firewall rules should be managed manually.
3. You can check your firewall rules after creating the environment.
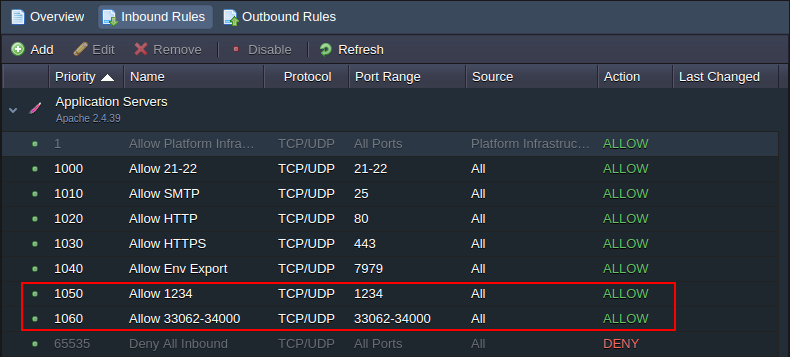
Tips:Below you can check out an example on how to set this variable via Cloud Scripting:
jpsType: install
name: JELASTIC_PORTS env variable
nodes:
  nodeType: apache2
  nodeGroup: cp
  env:
    JELASTIC_PORTS: 3306, 33061, 33062
Rule management
For convenience in managing existing firewall rules and providing new rules. The top control panel contains a set of buttons:Add, Edit, Remove, Disable (Enable) and Refresh.
When adding a new firewall rule The following parameters are set:
- Nodes- to select the desired environment layer
- Name- to name the record (Can be expanded to choose from commonly used presets)
- Protocol- To set the desired protocol type (TCP, UDP or TCP/UDP).
- Port Range- To define a specific port (e.g. 80) or range (e.g. 1024-2048) to be enabled/disabled for connections. Leave this field blank to apply the rule to all ports.
- Source- To select the origin request:
- Custom IP Address(es) - Separate entries with commas for IPv4/IPv6 addresses and CIDR blocks (e.g. 10.0.0.1,10.0.0.0/24)
- - predefined rangeAll, All IPv4, All IPv6, Local Network, Internet (Public Access)
- Environment Nodes - Node types (layers) from any environment in the account (this rule will be automatically padded/shrinked with the required IPs when the appropriate layer is scaled in/out)
- Priority- to set the priority of rules (where rules with lower values are applied first)
- Action- to define the actions required when a pairing request is received (allowordeny)
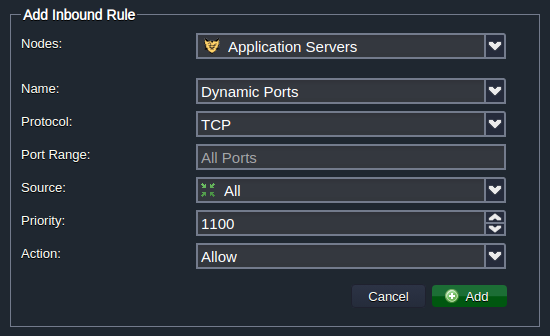
If it meets the needs ofEditDefault or custom rules You will be able to modify all the parameters described above except the Node field (for example, the target layer cannot be switched). Additionally, for testing purposes you can temporarily disable some rules and reapply them later with the button.Disable/EnablebuttonRefreshIt is very useful to update the rule list after some server adjustments (such as topology changes) without needing to restart the entire server.
Firewall Use Cases
Access to your nodes can be controlled based on request parameters such as source node IP address, connection protocol, port, etc. In the instructions below we will consider a simple example of blocking access to a container for a specific IP address, implemented through one of the following methods:
Note:Before following this advice Make sure your container has a public IP address.
In addition, when providing automatic solutions of container circuits. You may need to apply the required firewall changes throughRuk-Com PaaS API- Check the list of appropriate methods at the reference link.
Restrict access through the User Interface
As partially illustrated above, Ruk-Com cloud provides an intuitive and powerful GUI to manage firewall containers directly through the dashboard.
1. To access the appropriate control panel, click the button.Settingsnext to the desired environment and click on the sectionFirewall
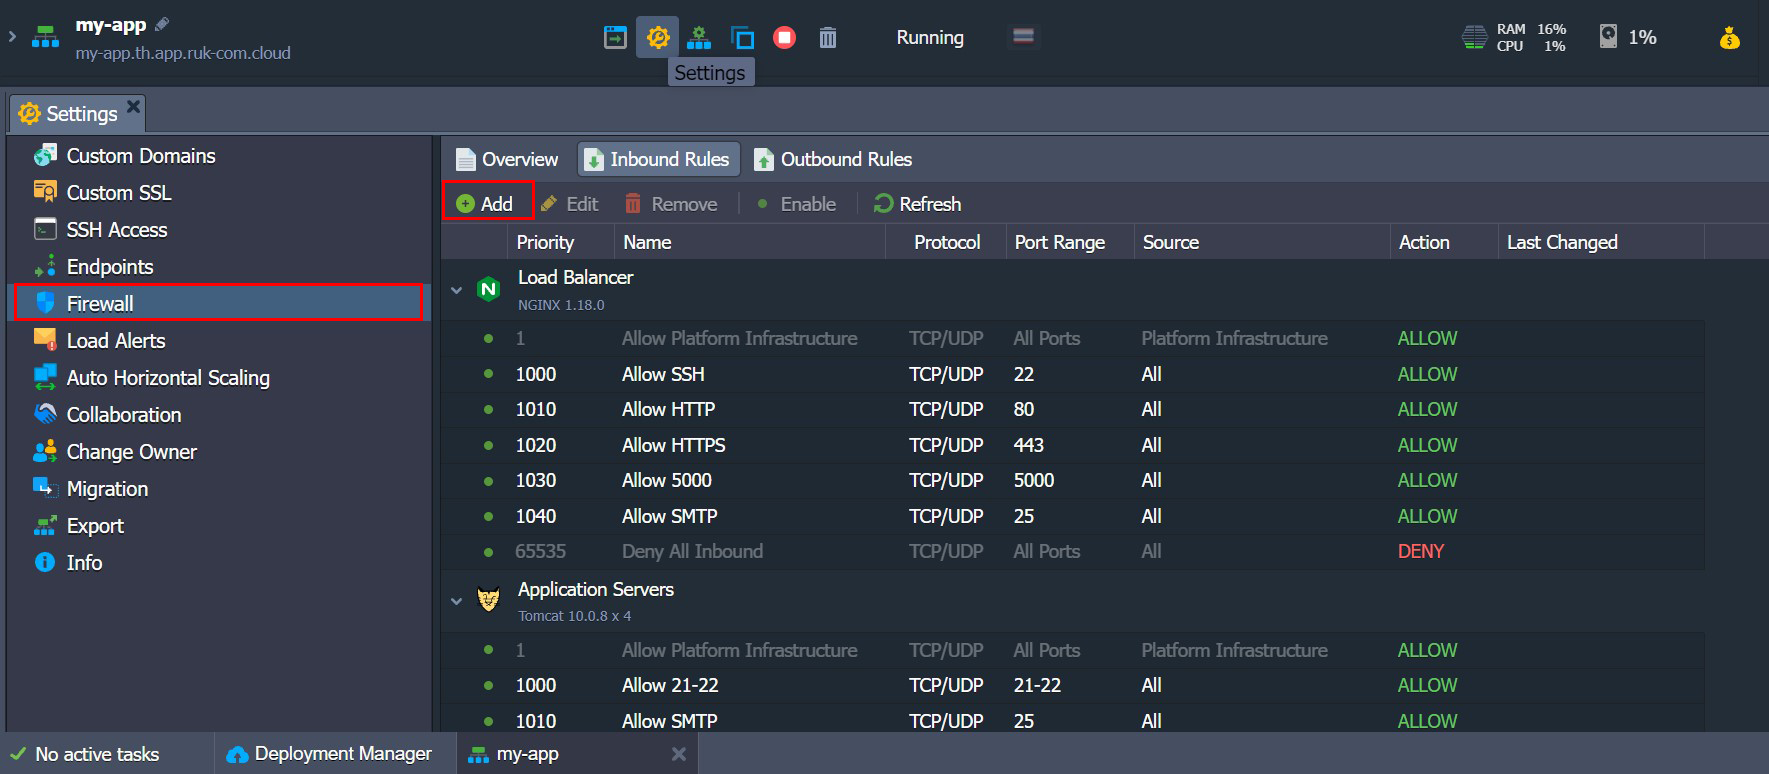
Select a tabInbound Rulesand click the buttonAdd(It will be obvious that To manage external container traffic, you need to select the tabOutbound Rulesinstead; where all parameter rules are similar to those described below)
2. When openedAdd Inbound RulesYou can configure new conditions for processing incoming words by the container.
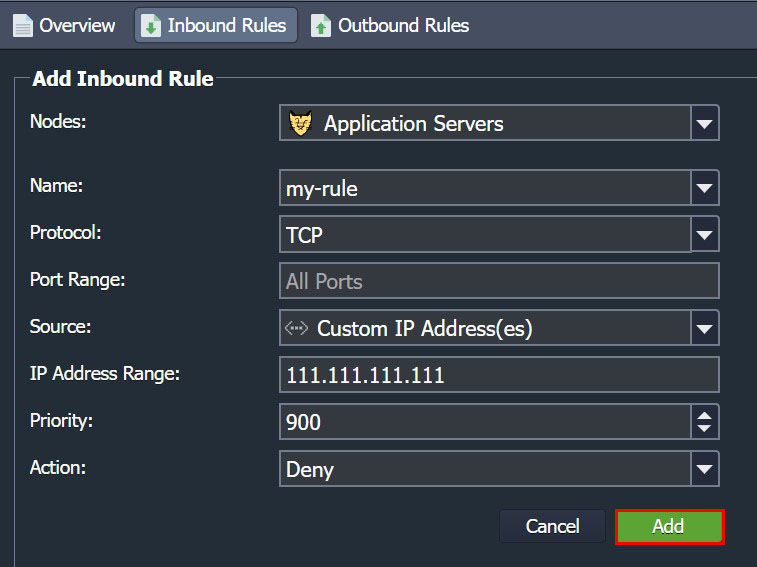
To refusedenyTo connect from a dedicated IP (based on our recommended use case example), fill in the following fields.
- Nodes- Select a container to restrict access to (e.g. tomcat).
- Name- Enter the desired rule name (e.g. my-rule)
- Protocol- Select the desired protocol (TCP)
- Port Range- Deny access to all ports by leaving this field blank.
- Source- Select the custom IP address(es) option and enter the required IP in the field.IP Address Range(111.111.111.111)
- Priority- Set an appropriate priority for this record (e.g. 900 to be used before the default rule).
- Action- Select Deny option
Click Add to automatically save and apply your rule.
3. Now when trying to connect to your node from IP address111.111.111.111specified, the user will be shown the following page:
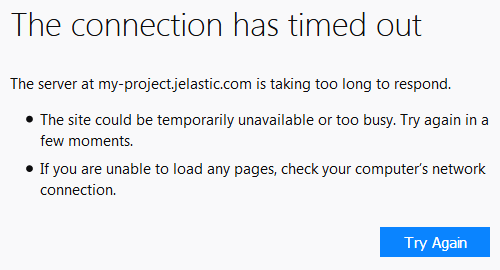
This allows you to deny access to your container from any IP address.
Restricting access via SSH
Alternatively, you can configure firewall rules for your container viaterminalWhen accessing a node throughSSH Gate
Note:Although most firewall configuration can be done through a dedicated user interface, management via SSH is more flexible (for example, allowing redirect NAT configuration). Such rules will not appear in the UI list, but will have higher priority.
1. The easiest way to access a node via SSH is to call the appropriate Web SSH directly from the dashboard - click the desired node once connected. Let's check the file. /etc/Ruk-Com PaaS/metainf.conf To ensure container firewall is turned off:
cat /etc/jelastic/metainf.conf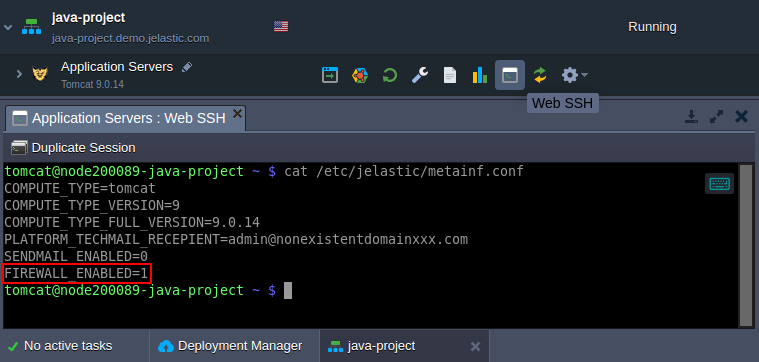
Here the parametersFIREWALL_ENABLEDIt should be equal to "1". If it isn't, please contact your hosting provider to request enabling firewall protection for your account.
2. You need to edit the file./etc/sysconfig/iptables-custom(e.g. vim editor)

Note:File /etc/sysconfig/ip6tables-custom Should be used when working with IPv6 rules.
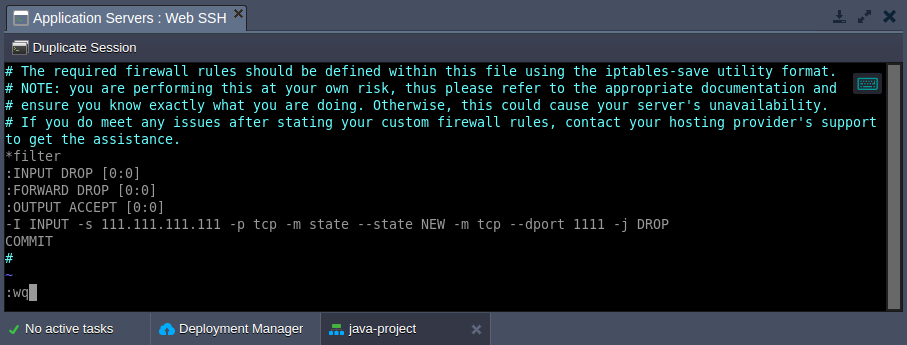
3. Declare required firewall rules using the widget format. iptables-save For example, the following code should be used to deny access from a specific IP (such as 111.111.111.111):
filter
:INPUT DROP [0:0]
:FORWARD DROP [0:0]
:OUTPUT ACCEPT [0:0]
-I INPUT -s 111.111.111.111 -p tcp -m state --state NEW -m tcp --dport 1111 -j DROP
COMMIT
\#
4. Use the following command to apply custom firewall settings to the container's default firewall rules.
sudo /usr/bin/jem firewall fwstart
5. You can now check the list of currently running firewall rules for your container using the following command:
sudo jem firewall list {table} {options}where:
- {table}- specify iptable target (filter,nat,mangle,raw)
- {options}- List iptable parameters (should be used)
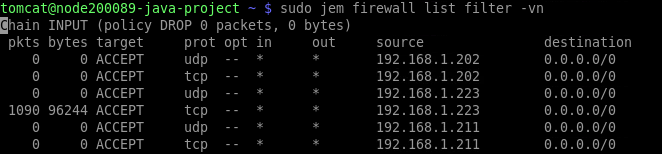
Your custom rules come after the default rules. which denies access to your node from IP 111.111.111.111
Setting up rules through the Ruk-Com PaaS API
In some cases (such as defining scripts, automation, etc.), you may need to configure firewall rules through code. You can use the appropriate method from the section.environment > Securityin the documentRuk-Com PaaS API
- AddRule- Create new rules
- AddRules- Add multiple rules
- EditRule- Change the parameters of an existing rule.
- GetRules- Displays a list of rules for the environment.
- RemoveRule- Delete rule
- RemoveRules- Delete multiple rules
- SetFirewallEnabled- Turn on the firewall
- SetRuleEnabled- Activate existing rules
- SetRules- Replace existing rules
In this way, Container Firewall management allows you to effectively control the availability of nodes in your account. and greatly increases the security of the application. (by filtering desired and unwanted connections)