Container Redeploy
This guide has been reviewed and reformatted for Ruk-Com Cloud PaaS. Screens may vary slightly by platform version.
Click or tap a screenshot to view it at its original size.
Objective
This guide explains how to use Container Redeploy on Ruk-Com Cloud PaaS, with ordered procedures and practical verification points.
Before you begin
- Sign in with an account permitted to manage the relevant environment.
- Confirm the target environment, region and resources before saving changes.
- Create a backup or rollback plan before changing a production system.
Most Docker solutions (includingstacksManaged by Ruk-Com Cloud) products are continuously developed into new versions and modifications. Therefore, we recommend that you update the template regularly according to the latest version.
Such an operation is called "redeploy"When managed on the platform, the following specifications are available:
- Custom user data and sensitive local files will be preserved during updates:
- Volume contents volumes(default and custom)
- List files in/etc/jelastic/redeploy.conf(Ruk-Com Cloud stack specific configuration) to ensure container availability
- Configuration related toAutoFS and NFS(/etc/autofs.jelastic, /etc/auto.master, /etc/exports)
- Configurationfirewall(/etc/sysconfig/iptables-custom, /etc/sysconfig/iptables4-jelastic, /etc/sysconfig/iptables6-jelastic, /etc/iptables/rules.v4)
- Access to informationSSH (/root/.ssh/authorized_keys, /root/.ssh/authorized_keys2, /root/.ssh/id_rsa)
- Custom configurationAll previously specified functions are not affected, such as run commands, links, variables, etc.
- If used with multiple instances (scales automatically)horizontal) Container updates can be performed one at a time. without stopping work (downtime)
This way you can update your Docker-based container to a new version. It does not impact internal applications. With Ruk-Com Cloud PaaS, redeploying new containers is easy. Just a few steps, like clicking through the dashboard UI or automating tasks through the API.
Note:
Integration with MySQL, MariaDB, or Percona databases does not support downgrading (redeploying to an older version), but if necessary We recommend backing up and restoring the database after redeploy (or in a completely separate container).
Update Container via Dashboard
The most intuitive method for redeploying tag templates is using the Ruk-Com Cloud Dashboard following the instructions and required steps:
1. Reimplementation can be accessed in two different ways:
- Select the Redeploy Container(s) button from the desired node/layer (for updating all containers at once).

- Select buttonChanging Environment TopologyTo modify the existing environment

- Click the pencil icon to change the Tag version for your container.

You can also adjust additional options:
- Preserve volumes - If enabled, databases in volumes are protected from deletion and will remain available after redeploy.
- For horizontal containers, you can choose from two options:
- Simultaneous deployment- redeploy all nodes at once which is relatively faster But it will cause your application to stop working for a short period of time (downtime).
- Sequential deployment with delay- redeploy instances one by one This is quite slow, but the node is always running to process incoming requests (no downtime).
After all the values have been configured, click the button.Redeployand press the confirm buttonYes

3. After the update is complete, you will see a notification in the top right corner of the dashboard.

Click the buttonShow Logsto view information about the updated container Node ID, name:tag, and Duration.

Now that you know how to redeploy containers through the Ruk-Com Cloud Dashboard, the following article describes how to update containers through the Ruk-Com Cloud API/CS/CLI.
Update Container via Ruk-Com Cloud API/CS/CLI
The update process can be automated using Ruk-Com Cloud API, Cloud Scripting and CLI (command-line interface).
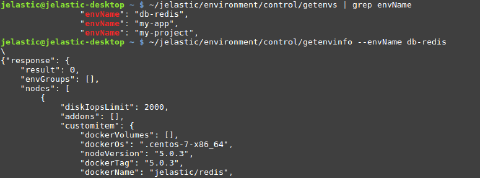
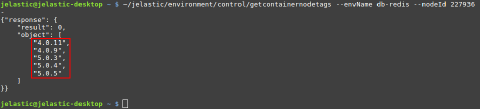
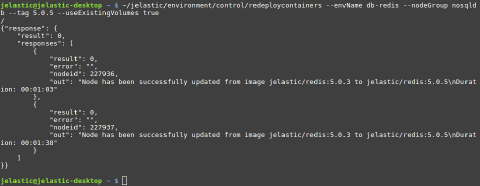
Tips:Example detailed information on redeploying a container viaCLI
Redeploying a new container is done with theenvironment.Control.RedeployContainersThis can be managed with the following parameters:
- envName- The name of the environment that the container should redeploy.
- session- Specify the user's session (ortoken) to be used for authentication.
- nodeGroup- specifyenvironment layerto be updated (Not required)
- nodeId- Specify the ID number of the specific container to redeploy (Not required)
You must specify parameters.nodeGroupornodeId To set the target of the operation, omitting nodeGroup if not specified may fail.
- tag- Version of the image to be installed.
- useExistingVolumes- Set to true to store data in volumes inside the updated container (Not required)
- login and password- Image access credentials from private registry (Not required)
- skipReinstall- determines whether the image should be extracted on an existing file system (true) or mounted to a new instance (default false) (Not required)

You can use the following structure to define local container updates.automation scripts:
1. Redeploy all container layers

As follows:
- {nodeGroup}-environment layer (or node group)That should all be updated.
- {myImage}- Name of the image to be deployed.
- {newTag}- The desired version of the image.
2. Update specific containers

Here {nodeId} should be replaced with the ID number of the desired node (other parts are the same as in the example above).
Saving Custom Data during Container Redeploy
In each container managed by Ruk-Com Cloud there is a special file namedredeploy.confThis will store the required list of containers. These settings are automatically preserved in the platform during container redeployment. For this reason, some common files are provided across all stacks:
- /etc/jelastic/redeploy.conf- Current redeploy configuration (to store required entries for saving files and collecting files) between each new container installation)
- ${home}/.bash_profile- Contains default SSH shell settings (e.g. shell instructions, required config files to fetch, etc.)
- /etc/sysconfig/iptables- Store default firewall rules.
- /etc/sysconfig/iptables-custom- Contains the rules ofcustom firewall
- /var/lib/jelastic/keys- Stores uploaded SSH private keys that are required to access the container via SSH and for interacting with other containers.
You can also click here to view the specific stack files of redeploy.conf for each node type
Preserving the default configuration list They can be added together with your custom files and folders by opening them.redeploy.confand add the path name to your desired entry. (Each item should be listed on a separate line.)

Creating File Backup Copy Upon Image Redeployment
Ruk-Com Cloud PaaS provides a simple and convenient way to back up data for configuration files during container updates, that is, aside from replacing versioned configurations from new tags, a copy of the files before redeploy is preserved.
In the backup section You will need to specify the path to the required files. redeploy.conf Then add the file prefix “backup:” to save:

Note:This action is available for files only. (Not a file storagedirectories)
After redeploy, configurations from old containers can be identified by searching for extensions.".backup"which can be used for immediate revert If it is not compatible with the new configuration or change analysis
For example, managing all Ruk-Com Cloud PHP application servers creates a backup /etc/php.ini config.

After updating the container, you will see the new and previous version of the php.ini file.

Note:The new backup of file {file_name} will automatically replace the previous backup. (the existing file name) during redeploy
This way you can easily revert to the previous settings by replacing the php.ini file with the backup. (such as renaming files or copying content) Now that you know how to manage templates versions (Docker tags) of containers within Ruk-Com Cloud PaaS, install them.