
Custom SSL
This guide is maintained for Ruk-Com PaaS. Screens and options may vary by platform version and account permissions.
Confirm the environment, region and account permissions, and back up current settings before changing a production system.
SSL certificates support gives a significant level of security for your domain names. With the platform, hosting of applications that need SSL becomes fairly easy.
In addition to the Built-In SSL and Let’s Encrypt SSL, the platform provides the ability to upload and use custom SSL certificates for your environments. The platform supports the following certificate types:
- Self-signed
- Wildcard
- Multi-Domain
- Extended validation single domain
- Extended validation multi-domain
- Low assurance/domain-validated certificate
In this instruction, we’ll show you how to get a single-domain Custom SSL certificate enabled at your environment.
Generate a Custom SSL Certificate
In order to add the Custom SSL certificate to your environment, you need to have:
- pre-purchased custom domain name
- server key
- intermediate certificate or certificates chain (CA)
- domain certificate
Therefore, follow the next instruction:
-
Buy a Domain Name (e.g., mysite.com) using any domain registrar.
-
Generate your server key for the purchased domain name and create a Certificate Request on its basis with the help of any preferred tool.
We’ll use OpenSSL as an example. Depending on the operating system you are using, perform the following steps:
For Windows
Download the latest OpenSSL tool version. Extract the received archive and run the tool by double-clicking the openssl.exe file in the bin folder. Subsequently, the files created with OpenSSL will appear in the same bin directory by default.
- First, you need to generate an SSH private server key with the following command:
bash Copy
genrsa -out {filename} {length}
where
{filename} - name of the output key file with .key extension (e.g., server.key)
{length} - private key length in bits (should be at least 2048 to be considered secure, e.g., 4096)
Note: DO NOT protect your key with a passphrase; otherwise, you’ll get an error during its addition to the platform dashboard.
 * Then you should generate a certificate request based on the prepared key. Create it as follows:
bash Copy
req -config {config_path} -new -key {keyname} -out {filename}
where
{config_path} - path to the openssl.cnf configuration file, located in the directory with extracted OpenSSL files (specified according to the C:\path\to\openssl.cnf format)
{keyname} - your server key name (the one you’ve generated in the previous step, server.key in our case)
{filename} - desired name of the output request file with .csr extension (e.g., server.csr)
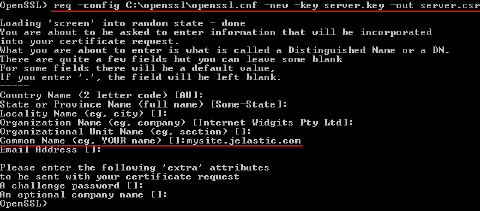
You’ll see a set of questions appear. Answer them to complete the certificate information with your data.
Note: The Common Name parameter value has to be equal to your purchased domain name; otherwise, your certificate won’t be validated.
For Linux/MacOS/FreeBSD
In case you don’t have the OpenSSL tool installed yet, get it with the appropriate command (according to your OS package manager) executed within your terminal. E.g., for Ubuntu/Debian Linux distribution use the following one:
bash Copy
sudo apt-get install openssl
When the installation process is completed, proceed to generation of the required files. All newly created with OpenSSL files will appear in the home directory of your local machine user by default.
- First, you need to generate an SSH private server key. For that run the following command:
bash Copy
openssl genrsa -out {filename} {length}
where
{filename} - name of the output key file with .key extension (e.g., server.key)
{length} - private key length in bits (should be at least 2048 to be considered secure, e.g., 4096)
Note: DO NOT protect your key with a passphrase; otherwise, you’ll get an error during its addition to the platform dashboard.
 * Then you should generate a certificate request based on the prepared key. Create it as follows:
bash Copy
openssl req -new -key {keyname} -out {filename}
where
{keyname} - your server key name (the one you’ve generated in the previous step, server.key in our case)
{filename} - desired name of the output request file with .csr extension (e.g., server.csr).
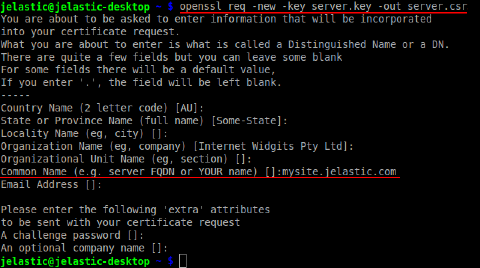
You’ll see a set of questions appear. Answer them to complete the certificate information with your data.
Note: The Common Name parameter value has to be equal to your purchased domain name; otherwise, your certificate won’t be validated.
 3. Send the Certificate Request you’ve received to your preferred Certificate Authority (CA) company for signing.
Tip: You can sign certificates yourself, follow the link to see the detailed instruction.
- The chosen CA checks the identity of the domain owner and (if everything is ok) sends the Intermediate certificate and Domain certificate back to you.
Once you’ve received all the required files, you can proceed to configuring your environment.
Adjust Environment Topology
In order to be secured with a Custom SSL certificate, your environment should have custom domain and Public IP address attached to your application server.
Note: Environments based on the .NET, Go, Node.js servers or custom Docker containers should include the certified load balancer to support custom SSL. In these cases, the external IP address should be attached to the balancer instead of an application server as it becomes the entry point of your environment.
-
Log into the platform dashboard and create a New Environment (or click the Change Environment Topology button for an existing one).
-
In the opened Environment Topology dialog, click on the SSL section switcher above the server blocks and check if all the Custom SSL requirements are fulfilled (i.e., if all the options in the requirements list are marked with a green tick).
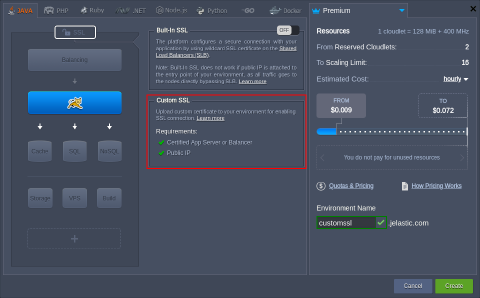 If they are not, the platform can help you to Enable these requirements for your environment in one click. Select the appropriate button next to the list of requirements and your environment topology will be instantly tuned according to them.
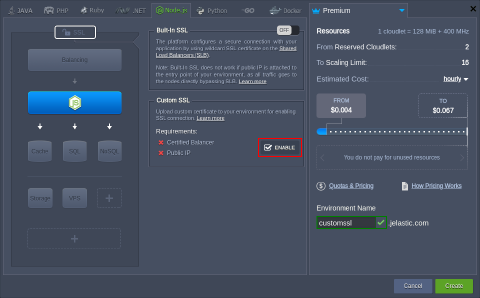 To complete the adjustment, click Create for a new environment or click on Apply in case you’ve edited the existing one.
Domain Name and A Record Settings
Now you need to set an A Record in order to point your custom domain name to the public IP address of your application.
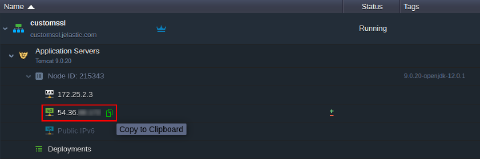
- Expand the entrypoint node for your environment (load balancer or application server) to see the list of IPs. Click Copy to Clipboard next to your public IP address.
 2. Then, navigate to DNS Manager of the chosen domain registrar system (the one you’ve used for your custom domain name purchase) and set an A Record within it.
Additional information and a detailed example can be found in the appropriate Custom Domain Name document.
Upload Certificate to the Environment
The last step that you need to perform is to upload the certificate files to your environment.
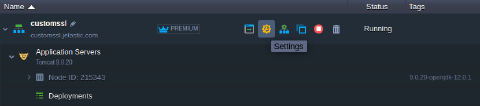
- Click Settings for the configured environment.
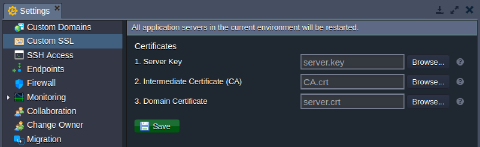
 2. In the opened tab, choose the Custom SSL option within the left-hand list. Upload Server Key, Intermediate Certificate (CA) and Domain Certificate into the appropriate fields and click Save.
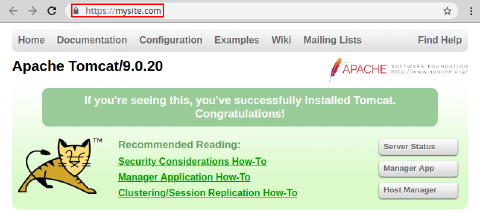
 When the servers in your environment are automatically restarted, let’s ensure everything works properly. For that, enter the bound custom domain name (or the attached external IP address) into your browser’s address bar with https:// connection protocol specified instead of the default http:// one. Your application should be opened without any problems.
 That’s all! Now you can be confident all the received/sent by your application data is secured and encrypted.