
Deployment Guide
This guide is maintained for Ruk-Com PaaS. Screens and options may vary by platform version and account permissions.
Confirm the environment, region and account permissions, and back up current settings before changing a production system.
The platform supports various ways of the applications automatic deployment, allowing to choose the most suitable option, which will suit your specific needs:
- Dashboard - corresponds to deployment via archive (provided either as local file or URL)
- VCS - allows to deploy from your VCS repository (e.g., Git, SVN, Bitbucket)
- Hub Registry - creates a custom container with your application based on the Docker image stored at your public or private registry
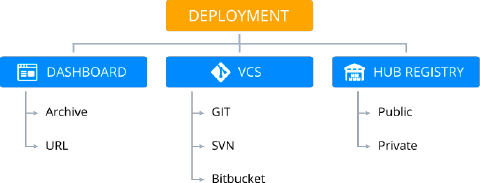 For more information on the last two options, use the appropriate links, while in this guide we’ll describe deployment via archive and VCS repository. They can be called either from Deployment Manager or by hovering over the Deployments record, which is provided for all application servers, and clicking one of the appropriate buttons.
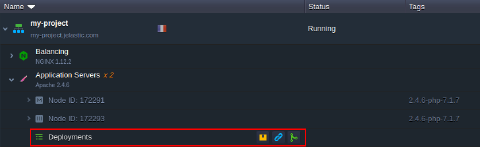 The first two icons (Local file and URL) corresponds to deployment via archive and the last one (Git / SVN) - to deployment from the VCS repository. Choose the appropriate option and click it to proceed with your deployment configuration.
Notes:
- the VCS deployment type for Java application servers is performed with a help of the Maven build node, refer to the linked guide for additional details
- .NET deployment process for the Windows-based IIS application server is different from the standardized flow described in this guide
Archive Deployment Configurations
The process is extremely simple and can be started in just a few seconds by setting two main parameters (i.e., providing required archive and specifying a target environment). Herewith, deployment can be tuned up to your specific needs by adjusting the additional configs.
Below, we’ve provided a detailed description for all the possible options within the deployment frame:
- Local file (or URL) - points to the archive file to be deployed (is automatically selected, when installing from Deployment Manager)
- Environment - selects a target environment with the application server (is automatically selected, when installing from application server)
- Path - sets the desired custom context; herewith, the available options may be limited due to the used programming language specifics (e.g., Python and Node.js have a single predefined deployment path only)
- Hooks - applies the provided scripts either before or after deployment process
- Deploy Strategy (for deployments into scaled server) - allows to choose between relatively quicker Simultaneous deployment variant, which causes a brief downtime, and the Sequential deployment with delay option to perform deployment on servers one-by-one with a set delay between operations, which ensures application uptime
- Enable zero-downtime deployment (for PHP servers only) - adjusts (if option is ticked) the deployment flow to avoid application downtime
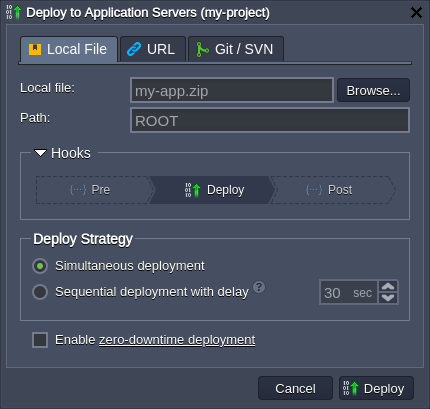 Click Deploy to initiate the process itself.
Git / SVN Deployment Configurations
The process is extremely simple and can be started in just a few seconds by setting two main parameters (i.e., selecting the required repository from Deployment Manager and specifying a target environment). Herewith, deployment can be tuned up to your specific needs by adjusting the additional configs.
Below, we’ve provided a detailed description for all the possible options within the deployment frame:
- Repository - allows to select the Git / SVN project from Deployment Manager (or jump to its addition form)
- Branch - defines the used repository branch (master by default)
- Environment - selects a target environment with the application server (is automatically selected, when installing from application server)
- Path - sets the desired custom context; herewith, the available options may be limited due to the used programming language specifics (e.g., Python and Node.js have a single predefined deployment path only)
- Build (for Java application deployments) - allows to choose the existing Maven build node (or add one into the target environment) and, if required, to select repository Working Directory
- Hooks - applies the provided scripts either before or after deployment process
- Deploy Strategy (for deployments into scaled server) - allows to choose between relatively quicker Simultaneous deployment variant, which causes a brief downtime, and the Sequential deployment with delay option to perform deployment on servers one-by-one with a set delay between operations, which ensures application uptime
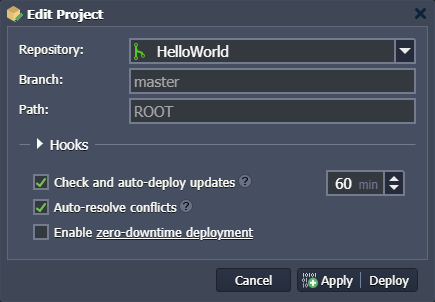
- Check and auto-deploy updates - enables periodical check ups for code changes in your repository (with configurable frequency); if any, project automatic deployment is initiated
- Auto-resolve conflicts - prevents the occurrence of merge conflicts by updating the contradictory files to the repository version (i.e., locally made changes are discarded)
- Enable zero-downtime deployment (for PHP servers only) - adjusts the deployment flow to avoid application downtime
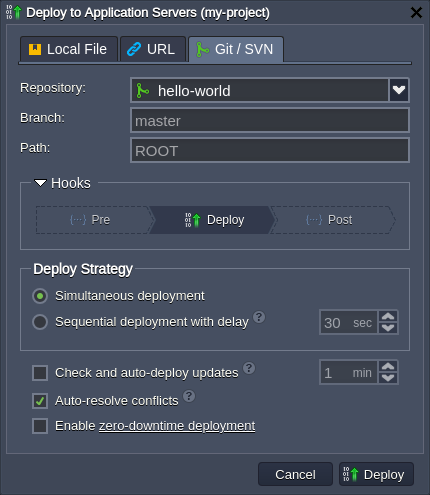 Click Deploy to initiate the process.
In a few minutes your application will be successfully deployed. Now, you can access it with the Open in Browser button, analyzed via Logs or managed with file manager / via SSH access.
Editing Git / SVN Projects
If needed, you can adjust the already deployed VCS project by clicking the Edit button for the appropriate deployment.
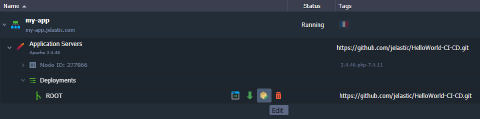 Within the opened frame, you can edit the same parameters described above for the deployment frame. For example, it is possible to switch a branch, add hooks, enable updates auto-deploy, etc.
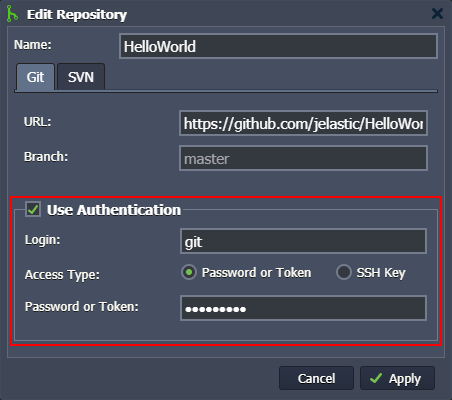
Note: If access credentials to the project’s repository were changed, you need to provide new ones at the platform to continue working with this project. First, edit authentication for the repository at the Deployment Manager.
 Then, you need to Edit all the already existing projects from this repository. The platform will automatically ask if you wish to update the credentials.
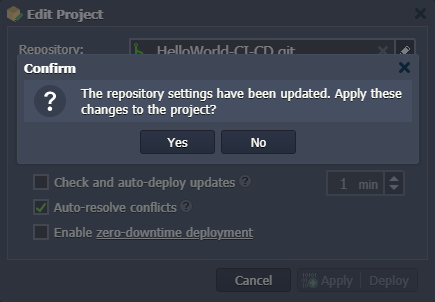 Click Yes to apply new credentials for the project.
FAQs
Is deployment via archive supported for all programming languages?
Yes, you can deploy your application via archive for all the supported programming languages on the platform (i.e., Java, PHP, Ruby, Python, Node.js, .NET, Go).
What archive formats are supported for deployment via archive?
The platform supports the following archive formats for deployment via archive: .zip, .tar.gz, .tar.bz2, .tar, .war, .jar.
Is deployment from VCS supported for all programming languages?
Yes, you can deploy your application from VCS for all the supported programming languages on the platform (i.e., Java, PHP, Ruby, Python, Node.js, .NET, Go).
What deployment method should I choose?
The choice of deployment method depends on your specific needs:
- If you have a ready application packaged in an archive file, use deployment via archive (either from local file or URL).
- If your application code is stored in a version control system (like Git or SVN), and you want to manage versions and updates easily, use deployment from VCS.
Can I automate deployments?
Yes, the platform supports automation of deployments. You can set up automatic deployment for your VCS projects by enabling the “Check and auto-deploy updates” option in the deployment configurations. This allows the platform to periodically check for code changes in your repository and automatically deploy updates when changes are detected.
How can I avoid downtime during deployments?
To minimize or avoid downtime during deployments, you can use the following options:
- For deployments into scaled servers, choose the “Sequential deployment with delay” option in the “Deploy Strategy” settings. This performs deployment on servers one-by-one with a set delay between operations, ensuring application uptime.
- For PHP servers, enable the “Enable zero-downtime deployment” option to adjust the deployment flow to avoid application downtime. Refer to the PHP Zero-Downtime Deployment guide for more details.